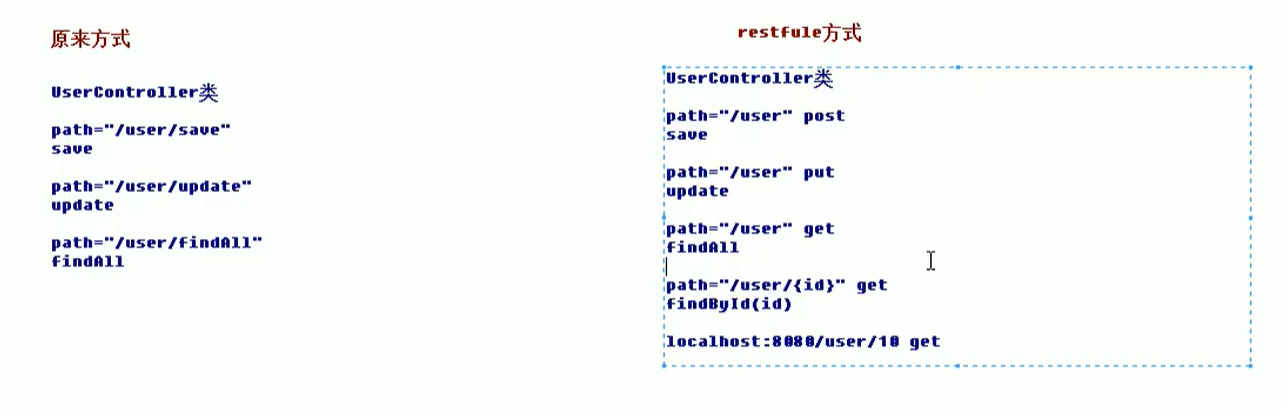
什么是 MVC
MVC- Model - View - Controller 的简写。是一种软件设计规范
是将业务逻辑、数据、显示分离的方法来组织代码。
MVC 主要作用是降低了视图与业务逻辑间的双向偶合。
MVC 不是一种设计模式,MVC 是一种架构模式。当然不同的 MVC 存在差异。
Model(模型): 数据模型,提供要展示的数据,因此包含数据和行为,可以认为是领域模型或 JavaBean 组件(包含数据和行为),不过现在一般都分离开来:Value Object(数据 Dao) 和 服务层(行为 Service)。也就是模型提供了模型数据查询和模型数据的状态更新等功能,包括数据和业务。
View(视图):负责进行模型的展示,一般就是我们见到的用户界面,客户想看到的东西。
Controller(控制器):接收用户请求,委托给模型进行处理(状态改变),处理完毕后把返回的模型数据返回给视图,由视图负责展示。也就是说控制器做了个调度员的工作。
最典型的 MVC 就是 JSP + servlet + javabean 的模式。
Model1 和 Model2 时代
Model1
- 在 web 早期的开发中,通常采用的都是 Model1。
- Model1 中,主要分为两层,视图层和模型层。

Model1 优点:架构简单,比较适合小型项目开发;
Model1 缺点:JSP 职责不单一,职责过重,不便于维护;
Model2 时代
Model2 把一个项目分成三部分,包括视图、控制、模型。
- 用户发请求
- Servlet 接收请求数据,并调用对应的业务逻辑方法
- 业务处理完毕,返回更新后的数据给 servlet
- servlet 转向到 JSP,由 JSP 来渲染页面
- 响应给前端更新后的页面
- 职责分析:
Controller:控制器
- 取得表单数据
- 调用业务逻辑
- 转向指定的页面
Model:模型
- 业务逻辑
- 保存数据的状态
View:视图
- 显示页面
Model2 这样不仅提高的代码的复用率与项目的扩展性,且大大降低了项目的维护成本。
Model 1 模式的实现比较简单,适用于快速开发小规模项目,Model1 中 JSP 页面身兼 View 和 Controller 两种角色,将控制逻辑和表现逻辑混杂在一起,从而导致代码的重用性非常低,增加了应用的扩展性和维护的难度。Model2 消除了 Model1 的缺点。
回顾 Servlet
pom.xml
1 | <dependencies> |
然后编写我们的 hello.jsp
1 | <!DOCTYPE html> |
index.jsp
1 | <%-- |
编写 Servlet
1 | package com.hpg.Servlet; |
最后别忘了在 web.xml 下注册:
1 | <servlet> |
测试:
SpringMVC
概述
- SpringMVC 的特点:
- 轻量级,简单易学
- 高效 , 基于请求响应的 MVC 框架
- 与 Spring 兼容性好,无缝结合
- 约定优于配置
- 功能强大:RESTful、数据验证、格式化、本地化、主题等
- 简洁灵活
Spring 的 web 框架围绕DispatcherServlet [ 调度 Servlet ] 设计。
DispatcherServlet 的作用是将请求分发到不同的处理器。从 Spring 2.5 开始,使用 Java 5 或者以上版本的用户可以采用基于注解形式进行开发,十分简洁;
正因为 SpringMVC 好 , 简单 , 便捷 , 易学 , 天生和 Spring 无缝集成(使用 SpringIoC 和 Aop) , 使用约定优于配置 . 能够进行简单的 junit 测试 . 支持 Restful 风格 .异常处理 , 本地化 , 国际化 , 数据验证 , 类型转换 , 拦截器 等等…
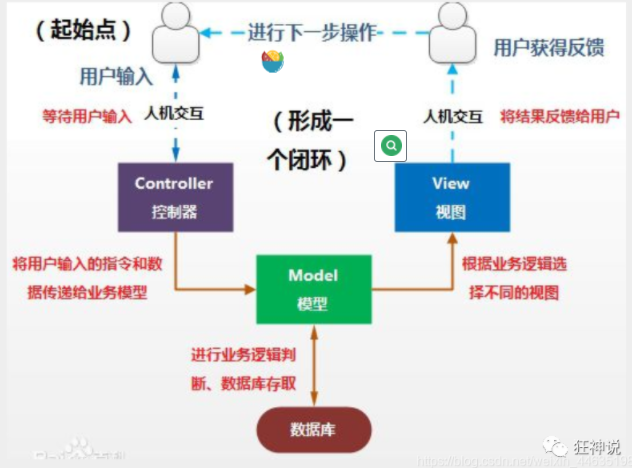
中央控制器
- Spring 的 web 框架围绕
DispatcherServlet设计。 - DispatcherServlet 的作用:是将请求分发到不同的处理器。从 Spring 2.5 开始,使用 Java 5 或者以上版本的用户可以采用基于注解的 controller 声明方式。
DispatcherServlet的本质由下图我们也可以发现,其实就是个 Servlet
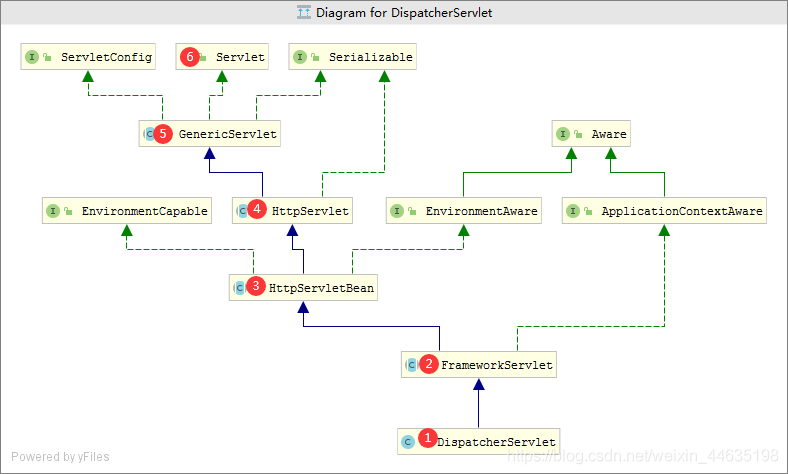
Spring MVC 框架像许多其他 MVC 框架一样, 以请求为驱动 , 围绕一个中心 Servlet 分派请求及提供其他功能,DispatcherServlet 是一个实际的 Servlet (它继承自 HttpServlet 基类)。
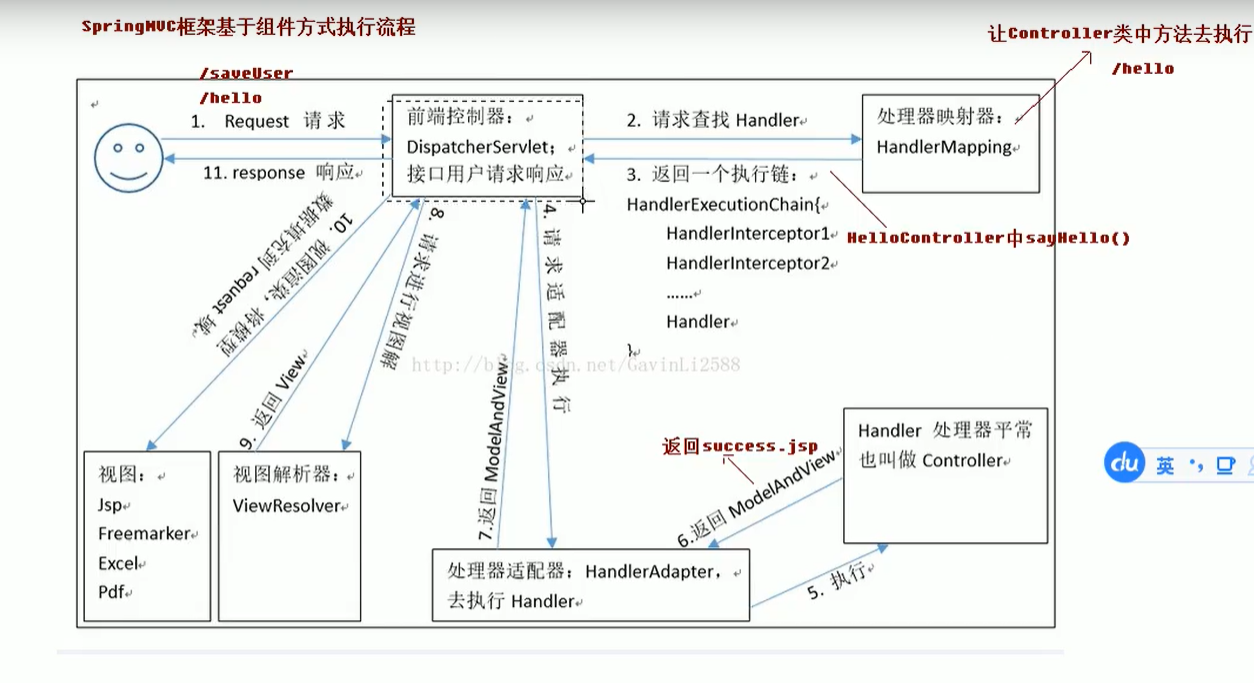
SpringMVC 工作流程
相关 blog:https://www.cnblogs.com/hamawep789/p/10840774.html
工作原理图
springmvc 工作流程
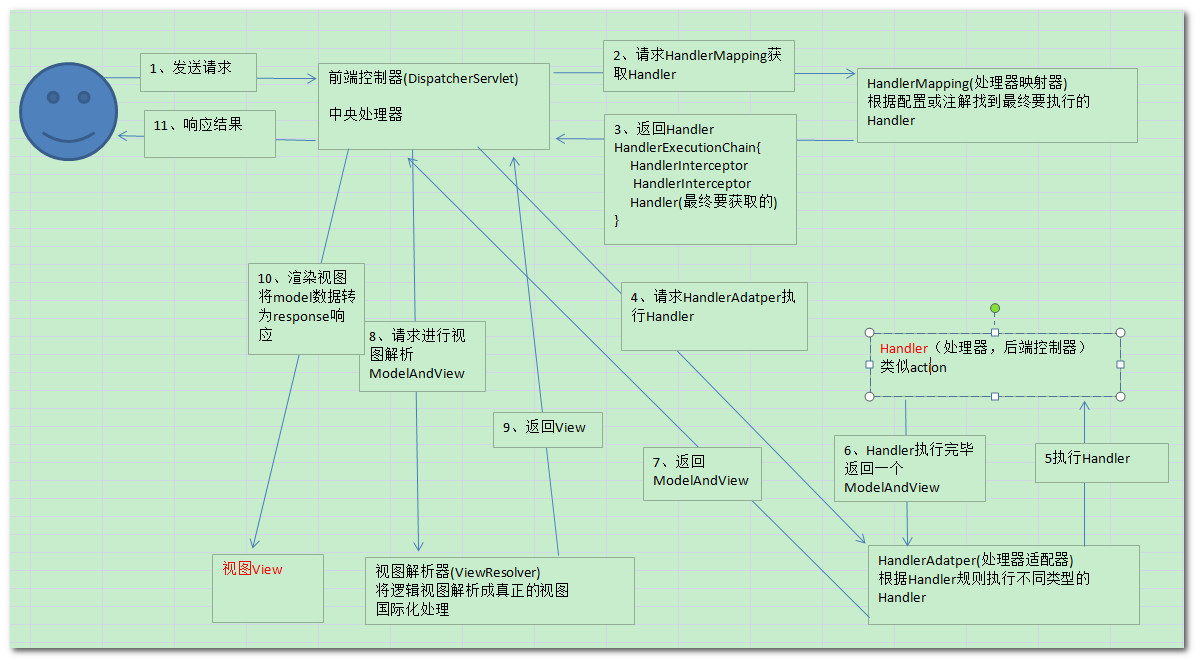
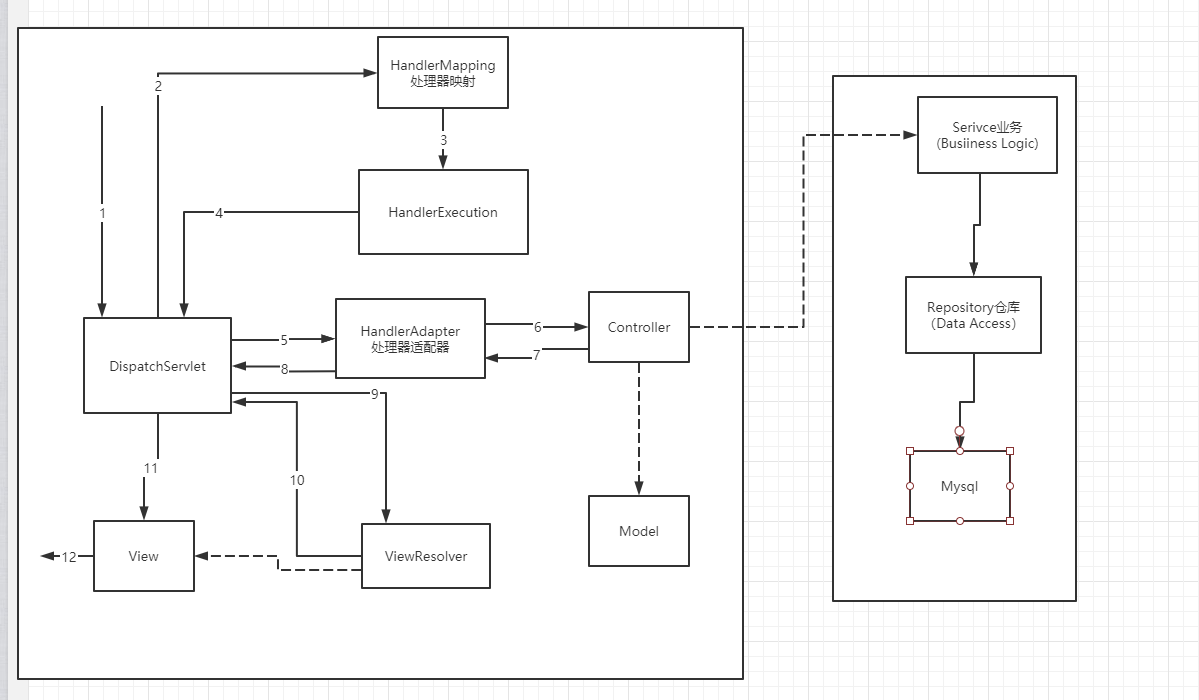
1、 用户向服务端发送一次请求,这个请求会先到前端控制器DispatcherServlet(也叫中央控制器)。
2、DispatcherServlet接收到请求后会调用 HandlerMapping 处理器映射器。由此得知,该请求该由哪个 Controller 来处理(并未调用 Controller,只是得知)
3、DispatcherServlet调用 HandlerAdapter 处理器适配器,告诉处理器适配器应该要去执行哪个 Controller
4、HandlerAdapter 处理器适配器去执行 Controller 并得到 ModelAndView(数据和视图),并层层返回给DispatcherServlet
5、DispatcherServlet将 ModelAndView 交给 ViewReslover 视图解析器解析,然后返回真正的视图。
6、DispatcherServlet将模型数据填充到视图中
7、DispatcherServlet将结果响应给用户
组件说明
- DispatcherServlet:前端控制器,也称为中央控制器,它是整个请求响应的控制中心,组件的调用由它统一调度。
- HandlerMapping:处理器映射器,它根据用户访问的 URL 映射到对应的后端处理器 Handler。也就是说它知道处理用户请求的后端处理器,但是它并不执行后端处理器,而是将处理器告诉给中央处理器。
- HandlerAdapter:处理器适配器,它调用后端处理器中的方法,返回逻辑视图 ModelAndView 对象。
- ViewResolver:视图解析器,将 ModelAndView 逻辑视图解析为具体的视图(如 JSP)。
- Handler:后端处理器,对用户具体请求进行处理,也就是我们编写的 Controller 类。
HelloSpringMVC
配置版
下面试着来体验一下 SpringMVC 吧,首先来一个非注解版本的
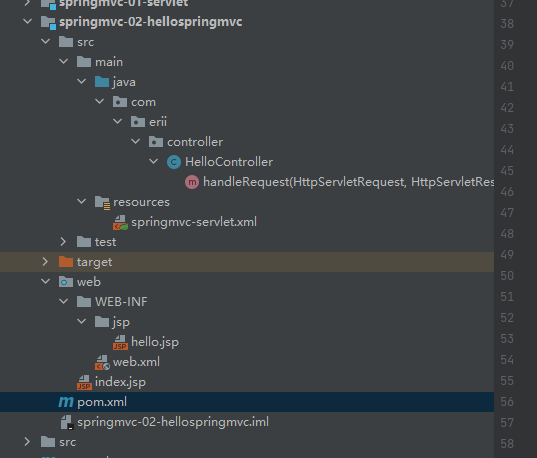
目录结构:
首先为该模块添加 WEB 支持 ofcourse
在 pom.xml 处配置好我们依赖(这一步一开始没弄,发现一直是 404)
配置 web.xml 进行我们的
DispatcherServlet注册1
2
3
4
5
6
7
8
9
10
11
12
13
14
15
16
17
18
19<!--1.注册DispatcherServlet-->
<servlet>
<servlet-name>springmvc</servlet-name>
<servlet-class>org.springframework.web.servlet.DispatcherServlet</servlet-class>
<!--关联一个springmvc的配置文件:【servlet-name】-servlet.xml-->
<init-param>
<param-name>contextConfigLocation</param-name>
<param-value>classpath:springmvc-servlet.xml</param-value>
</init-param>
<!--启动级别-1-->
<load-on-startup>1</load-on-startup>
</servlet>
<!--/ 匹配所有的请求;(不包括.jsp)-->
<!--/* 匹配所有的请求;(包括.jsp)-->
<servlet-mapping>
<servlet-name>springmvc</servlet-name>
<url-pattern>/</url-pattern>
</servlet-mapping>在上述配置文件中 我们有个
<param-value>classpath:springmvc-servlet.xml</param-value>,这个新的配置文件是我们所没有的,因此我们需要去配置1
2
3
4
5
6
7
<beans xmlns="http://www.springframework.org/schema/beans"
xmlns:xsi="http://www.w3.org/2001/XMLSchema-instance"
xsi:schemaLocation="http://www.springframework.org/schema/beans
http://www.springframework.org/schema/beans/spring-beans.xsd">
</beans>注册 处理映射器
1
2<!--处理映射器-->
<bean class="org.springframework.web.servlet.handler.BeanNameUrlHandlerMapping"/>注册 处理器适配器
1
2<!--处理器适配器-->
<bean class="org.springframework.web.servlet.mvc.SimpleControllerHandlerAdapter"/>注册 视图解析器
1
2
3
4
5
6
7
8<!--视图解析器-->
<!--视图解析器:DispatcherServlet给他的ModelAndView-->
<bean class="org.springframework.web.servlet.view.InternalResourceViewResolver" id="InternalResourceViewResolver">
<!--前缀-->
<property name="prefix" value="/WEB-INF/jsp/"/>
<!--后缀-->
<property name="suffix" value=".jsp"/>
</bean>编写 Controller 控制器,进行业务的控制。有两种实现方式:实现
Controller接口,或是用注解去实现。我们这里选择前者1
2
3
4
5
6
7
8
9
10
11
12
13
14
15
16
17
18
19
20
21package com.erii.controller;
import org.springframework.web.servlet.ModelAndView;
import org.springframework.web.servlet.mvc.Controller;
import javax.servlet.http.HttpServletRequest;
import javax.servlet.http.HttpServletResponse;
public class HelloController implements Controller {
public ModelAndView handleRequest(HttpServletRequest request, HttpServletResponse response) throws Exception {
//ModelAndView 模型和视图
ModelAndView mv = new ModelAndView();
//封装对象,放在ModelAndView中。Model
mv.addObject("msg","HelloSpringMVC!");
//封装要跳转的视图,放在ModelAndView中
mv.setViewName("hello"); //: /WEB-INF/jsp/hello.jsp
return mv;
}
}我们需要将我们控制类交给 SpringIOC 容器,因此这一步就是注册 bean 了
1
2<!--Handler-->
<bean id="/hello" class="com.erii.controller.HelloController"/>编写需要跳转的 jsp 页面,显示 ModelandView 存放的数据,以及我们的正常页面;
1
2
3
4
5
6
7
8
9
10
11
12
13
14
15
16
17
18<%--
Created by IntelliJ IDEA.
User: Erii
Date: 2021/3/13
Time: 18:49
To change this template use File | Settings | File Templates.
--%>
<%@ page contentType="text/html;charset=UTF-8" language="java" %>
<html>
<head>
<title>Title</title>
</head>
<body>
${msg}
</body>
</html>测试环节

我们进行一个流程的分析吧:
DispatcherServlet表示前端控制器,是整个 SpringMVC 的控制中心。用户发出请求,DispatcherServlet接收请求并拦截请求。由于其本质就是个 Servlet,我们就把他当做一个功能强化版本的 Servlet 即可;
- 我们假设请求的 url 为 : http://localhost:8080/SpringMVC/hello
- 如上 url 拆分成三部分:
- http://localhost:8080 ——> 服务器域名
- SpringMVC ——> 部署在服务器上的 web站点
- hello ——> 表示控制器 Ccontroller
- 通过分析,如上 url 表示为:请求位于服务器 localhost:8080 上的 SpringMVC 站点的 hello 控制器。
HandlerMapping为 处理器映射。DispatcherServlet调用HandlerMapping,根据请求 url 查找Handler。HandlerExecution表示具体的Handler,其主要作用是根据url查找控制器,比如上述 url 被查找控制器为:hello。HandlerExecution将解析后的信息传递给DispatcherServlet,如解析控制器映射等。HandlerAdapter表示处理器适配器,其按照特定的规则去执行 Handler。(特定的规则其实就是去找实现了 Controller 接口的控制器)Handler让具体的Controller执行。(上一步中,可能会适配到多个 Contoller,在这步就会挑选具体的 controller 去执行请求)1
2<!--Handler-->
<bean id="/hello" class="com.erii.controller.HelloController"/>Controller将具体的执行信息返回给HandlerAdapter,如ModelAndView(模型和视图)。HandlerAdapter将视图逻辑名或模型传递给DispatcherServlet。DispatcherServlet调用视图解析器(ViewResolver)来解析HandlerAdapter传递的逻辑视图名。1
2
3
4
5
6
7
8<!--视图解析器-->
<!--视图解析器:DispatcherServlet给他的ModelAndView-->
<bean class="org.springframework.web.servlet.view.InternalResourceViewResolver" id="InternalResourceViewResolver">
<!--前缀-->
<property name="prefix" value="/WEB-INF/jsp/"/>
<!--后缀-->
<property name="suffix" value=".jsp"/>
</bean>视图解析器将解析的逻辑视图名传给
DispatcherServlet。DispatcherServlet根据视图解析器解析的视图结果,调用具体的视图。将数据渲染到视图上,将视图呈现给用户。
注解版
资源过滤问题:
1 | <build> |
配置 web.xml
1
2
3
4
5
6
7
8
9
10
11
12
13
14
15
16
17
18
19
20
21
22
23
24
25
26
<web-app xmlns="http://xmlns.jcp.org/xml/ns/javaee"
xmlns:xsi="http://www.w3.org/2001/XMLSchema-instance"
xsi:schemaLocation="http://xmlns.jcp.org/xml/ns/javaee http://xmlns.jcp.org/xml/ns/javaee/web-app_4_0.xsd"
version="4.0">
<!--1.注册servlet-->
<servlet>
<servlet-name>SpringMVC</servlet-name>
<servlet-class>org.springframework.web.servlet.DispatcherServlet</servlet-class>
<!--通过初始化参数指定SpringMVC配置文件的位置,进行关联-->
<init-param>
<param-name>contextConfigLocation</param-name>
<param-value>classpath:springmvc-servlet.xml</param-value>
</init-param>
<!-- 启动顺序,数字越小,启动越早 -->
<load-on-startup>1</load-on-startup>
</servlet>
<!--所有请求都会被springmvc拦截 -->
<servlet-mapping>
<servlet-name>SpringMVC</servlet-name>
<url-pattern>/</url-pattern>
</servlet-mapping>
</web-app>配置 springmvc 文件
1
2
3
4
5
6
7
8
9
10
11
12
13
14
15
16
17
18
19
20
21
22
23
24
25
26
27
28
29
30
31
32
33
34
35
36
37
38
<beans xmlns="http://www.springframework.org/schema/beans"
xmlns:xsi="http://www.w3.org/2001/XMLSchema-instance"
xmlns:context="http://www.springframework.org/schema/context"
xmlns:mvc="http://www.springframework.org/schema/mvc"
xsi:schemaLocation="http://www.springframework.org/schema/beans
http://www.springframework.org/schema/beans/spring-beans.xsd
http://www.springframework.org/schema/context
https://www.springframework.org/schema/context/spring-context.xsd
http://www.springframework.org/schema/mvc
https://www.springframework.org/schema/mvc/spring-mvc.xsd">
<!-- 自动扫描包,让指定包下的注解生效,由IOC容器统一管理 -->
<context:component-scan base-package="com.hpg.controller"/>
<!--
支持mvc注解驱动
在spring中一般采用@RequestMapping注解来完成映射关系
要想使@RequestMapping注解生效
必须向上下文中注册DefaultAnnotationHandlerMapping
和一个AnnotationMethodHandlerAdapter实例
这两个实例分别在类级别和方法级别处理。
而annotation-driven配置帮助我们自动完成上述两个实例的注入。
-->
<!-- 视图解析器 -->
<bean class="org.springframework.web.servlet.view.InternalResourceViewResolver"
id="internalResourceViewResolver">
<!-- 前缀 -->
<property name="prefix" value="/WEB-INF/jsp/" />
<!-- 后缀 -->
<property name="suffix" value=".jsp" />
</bean>
<mvc:annotation-driven />
</beans>编写 Controller
1
2
3
4
5
6
7
8
9
10
11
12
13
14
15
16
17
18
19package com.hpg.controller;
import org.springframework.stereotype.Controller;
import org.springframework.ui.Model;
import org.springframework.web.bind.annotation.RequestMapping;
public class HelloController {
//真实访问地址 : 项目名/HelloController/hello
public String sayHello(Model model){
//向模型中添加属性msg与值,可以在JSP页面中取出并渲染
model.addAttribute("msg","hello,SpringMVC");
//web-inf/jsp/hello.jsp 这里跳转的是jsp hello并不是个字符串
return "hello";
}
}测试

可以通俗的理解成两大步
- 启动服务器,加载一些配置文件
DispatcherServlet对象创建springmvc.xml被加载HelloController创建成对象
- 发送请求,后台处理请求,展示
- 做了一定的选项操作
- 请求给到了
DispatcherServlet(控制中心) - 接着找到相应的@RequestMapping 的方法,执行,包装模型,告诉
DispatcherServlet下面转到哪个视图 DispatcherServlet收到了响应,通知视图解析器,将视图解析;- 视图解析器帮我我们进行跳转,页面显示,响应给
DispatcherServlet DispatcherServlet接收到页面,展示给用户
RequestMapping 注解
@RequestMapping作用:建立
请求URL和处理方法之间的对应关系@RequestMapping的作用位置
类上:表示第一级的访问目录(方便我们进行模块化的管理)
方法上:表示第二级的访问目录
路径可不写;
/表示应用的根目录开始
${pageContextt.request.contextPath}:这是 JSP 用于取得绝对路径的方法。
比如我的项目名称是 demo1 在浏览器中输入为:
http://localhost:8080/demo1/a.jsp用
${pageContext.request.contextPath}或者
<%=request.getContextPath()%>取出来的就是/demo1,而”/“代表的含义就是
http://localhost:8080故有时候项目中这样写${pageContext.request.contextPath}/a.jsp
使用示例:
Controller:
1 |
|
jsp:
1 | <%@ page language="java" contentType="text/html; charset=UTF-8" |
@RequestMapping的属性
path:指定请求路径
value:作用于 path 属性相同
method:制定该方法的请求方式
params:指定限制请求参数的条件,要求请求参数的 key 和 value 必须和 配置的一模一样。
例如: params = {“accountName”},表示请求参数必须有 accountName params = {“moeny!100”},表示请求参数中 money 不能是 100。
headers:发送的请求中必须包含的请求头
使用示例:
Controller:
1 |
|
jsp 代码:
1 | <!-- 请求方式的示例 --> |
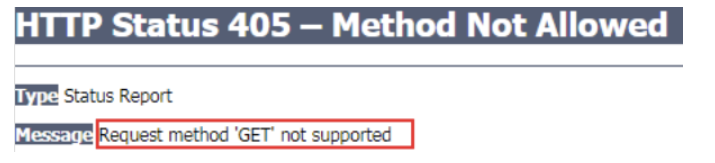
测试:
使用GET请求,报错 405,信息表示不支持Get方式请求
请求参数的绑定
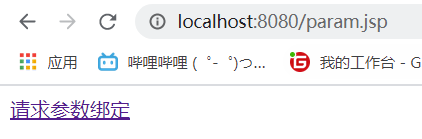
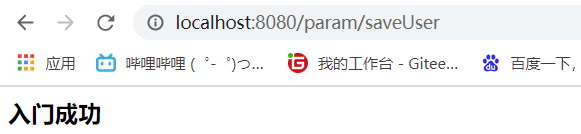
入门案例
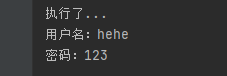
前端:
1 | <a href="param/testParam?username=hehe&password=123">请求参数绑定</a> |
控制器部分:
1 |
|
首先来到前端页面,点击请求参数绑定
跳转,并且得到预先设置的数据
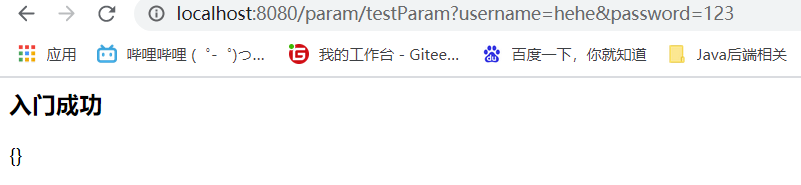
打印数据:
绑定的机制
在上述的 form 表单中,请求参数是基于key : value形式的,因此,SpringMVC绑定参数的实质就是:
通过把表单提交的请求参数,作为控制器中的方法参数进行绑定
如上述例子中的 username=hehe 以及 password = 123
1 | <a href="param/testParam?username=hehe&password=123">请求参数绑定</a> |
作为了控制器的 username 和 password
1 | public String testParam(String username,String password){ |
绑定支持的数据类型
请求参数绑定实体类型
实体类
Account 类:
1
2
3
4
5
6
7
8
9
10
11
12
13
14
15
16
17
18
19
20
21
22
23
24
25
26
27
28
29
30
31
32
33
34
35
36
37
38
39
40
41
42
43
44
45
46
47
48
49
50
51
52
53
54public class Account implements Serializable{
private String username;
private String password;
private Double money;
private User user;
public String getUsername() {
return username;
}
public void setUsername(String username) {
this.username = username;
}
public String getPassword() {
return password;
}
public void setPassword(String password) {
this.password = password;
}
public Double getMoney() {
return money;
}
public void setMoney(Double money) {
this.money = money;
}
public User getUser() {
return user;
}
public void setUser(User user) {
this.user = user;
}
public String toString() {
return "Account{" +
"username='" + username + '\'' +
", password='" + password + '\'' +
", money=" + money +
", user=" + user +
'}';
}
}User 类:
1
2
3
4
5
6
7
8
9
10
11
12
13
14
15
16
17
18
19
20
21
22
23
24
25
26
27
28
29
30public class User implements Serializable{
private String uname;
private Integer age;
public String getUname() {
return uname;
}
public void setUname(String uname) {
this.uname = uname;
}
public Integer getAge() {
return age;
}
public void setAge(Integer age) {
this.age = age;
}
public String toString() {
return "User{" +
"uname='" + uname + '\'' +
", age=" + age +
'}';
}
}
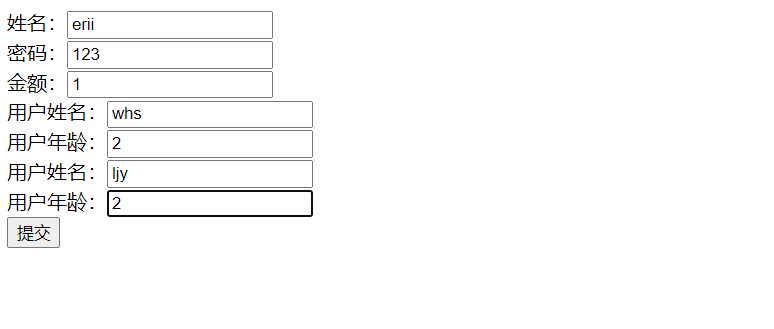
前端页面:
1 | <%--name 必须要和 实体类的属性名字是相同的--%> |
- Controller 方法
1 | /** |
测试:


请求参数绑定集合类型
假如不绑定实体类,使用集合类型,又该怎么绑定呢?
Account 类:
1 | private List<User> list; |
前端:
1 | <%--把数据封装Account类中,类中存在list和map的集合--%> |

配置解决中文乱码问题
其实解决中文乱码的过滤器,我们在 javaweb 部分也写过一个,有兴趣的朋友可以翻看 Javaweb 部分的笔记(在过滤器部分吧)
只不过就是 springmvc 帮助我们实现了这个 Filter 罢了,我们直接拿来用就好
1 | <!--配置解决中文乱码的过滤器--> |
自定义类型转换器
使用场景
假设我们的 User 类中新增了日期属性
1 | private Date date; |
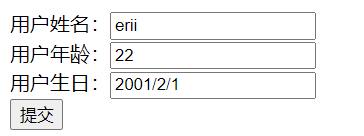
我们用户生日写法为:years/month/day,那确实可以执行:

但如果改一下:
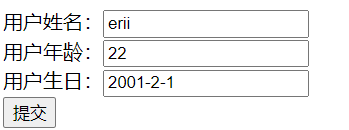
就会报:错误的请求

这就需要自定义类型转换器去解决这个问题
实现
想要实现自定义转换器,我们就需要继承Converter这个接口
1 | package org.springframework.core.convert.converter; |
字符串 → 日期的转换器
1 | /** |
配置:
1 | <!--配置自定义类型转换器--> |
此时我们再测试一次:

常用注解
RequestParam
- 作用:把请求中指定名称的参数给控制器中的形参赋值
什么意思呢?假设有以下场景:
1 | <a href="anno/testRequestParam?name=Test">RequestParam</a> |
1 |
|
我们前端中参数为name而控制器中的参数为username 此时我们能获取到数据吗?

此时,我们就需要使用@RequestParam这个注解咯
1 |
|
下面就来测试一下:
1 |
|
- 一些注意点
需要注意 @RequestParam(name = “name”)
中第一个name 对应的是 RequestParam 类中的 name,是不能写成别的 username 啊,name1 之类的,只能写成 name
第二个 name 呢,对应的是前端的name,假如前端写的是uname,那么这里也得写成uname
RequestBody
- 作用是获取请求体的内容;本质是获得 key=value &key =value 结构的数据
- 在
Get请求方式中是用不了的(因为在 Get 方式中是没有请求体的
前端页面:
1 | <form action="anno/testRequestBody" method="post"> |
1 | /** |

指的说明的是,就算我@RequestBody String body 中的参数不写 bdoy,写个与前端参数一样的 username
我这里前面加了@RequestBody注解,他会优先判断成是获取请求体内容,而不是简简单单一个 username;
PathVariable
- 作用:用于绑定 url 中的占位符;举个例子:请求 url 中的/xxxxx/{id}中的{id}就是一个 url 占位符
想要去学习这个注解,首先我们需要去了解一个新概念:REST 风格的 URL
REST 风格 URL
- 其实就是让请求路径相同,但是请求方式不同,最后走的业务操作就不同的一种风格
类似于 java 中重载的概念,假如我们的请求方式是相同的(类似于 java 中的方法名相同),但是传的参数不同(类比于 java 中的方法重载)。当有参数时,path 中带有:{参数},此时就出现了占位符,我们就可以用@PathVariable 进行占位符的绑定啦
注解演示
前端:此时就不是写 name=10 这种,直接就是个/10
1 | <a href="anno/testPathVariable/10">testPathVariable</a> |
控制层:
1 | /** |
1 | //注意:路径中的{}数据,需要与注解中的值填写成一样的 ,与id无关,这就是个形参 |
测试:

HiddentHttpMethodFilter
由于我们的浏览器form表单只支持GET和POST 请求,但我们的 REST 风格中可还有着DELETE、PUT等方法,那不就用不了了吗?
因此,我们可以依靠HiddentHttpMethodFilter这个过滤器,将浏览器的请求改为指定的请求方式
使用方法分三步:
web.xml 中配置过滤器
1
2
3
4
5
6
7
8
9
10<!-- 配置HiddentHttpMethodFilter过滤器,修改浏览器请求为指定方式 -->
<filter>
<filter-name>httpMethodFilter</filter-name>
<filter-class>org.springframework.web.filter.HiddenHttpMethodFilter</filter-class>
</filter>
<filter-mapping>
<filter-name>httpMethodFilter</filter-name>
<url-pattern>/*</url-pattern>
</filter-mapping>请求方式使用
POST提供
_method请求参数,这个参数的取值就是我们需要的请求方式啦1
2
3
4
5
6
7
8
9
10
11
12
13
14
15
16
17
18
19
20
21
22
23
24
25<!-- 保存 -->
<form action="springmvc/testRestPOST" method="post">
用户名称:<input type="text" name="username"><br/>
<!-- <input type="hidden" name="_method" value="POST"> -->
<input type="submit" value="保存">
</form>
<hr/>
<!-- 更新 -->
<form action="springmvc/testRestPUT/1" method="post">
用户名称:<input type="text" name="username"><br/>
<input type="hidden" name="_method" value="PUT">
<input type="submit" value="更新">
</form>
<hr/>
<!-- 删除 -->
<form action="springmvc/testRestDELETE/1" method="post">
<input type="hidden" name="_method" value="DELETE">
<input type="submit" value="删除">
</form>
<hr/>
<!-- 查询一个 -->
<form action="springmvc/testRestGET/1" method="post">
<input type="hidden" name="_method" value="GET">
<input type="submit" value="查询">
</form>
源码:

ReqeustHeader
- 作用:获取请求消息头
1 | <a href="anno/testRequestHeader">RequestHeader</a> |
1 | /** |


CookieValue
- 作用:用于获取指定cookie的值
1 | <a href="anno/testCookieValue">CookieValue</a> |
1 | /** |

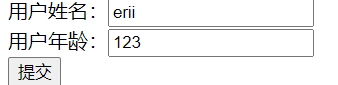
ModelAttribute
该注解的作用根据 位置的不同也有不同
1
2
3
4
5<form action="anno/testModelAttribute" method="post">
用户姓名:<input type="text" name="uname" /><br/>
用户年龄:<input type="text" name="age" /><br/>
<input type="submit" value="提交" />
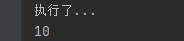
</form>出现在 Controller 上:会在每一个@RequestMapping 标注的方法前执行,若有返回值,就将自动把返回值加入到ModelMap上
{
System.out.println("testModelAttribute执行了...");
return "success";
}
public void showUser(String uname, Map<String,User> map){
System.out.println("showUser执行了...");
}https://er11.oss-cn-shenzhen.aliyuncs.com/img/image-20210316202154305.png)
出现在方法参数上:会把客户端传过来的参数按照名称注入到指定对象中,并将该对象自动加入到ModelMap中
同时,还能应用在这个场景:当表单提交的数据并不是完整的朱提类数据时(比如我有三个数据,你就给我提交了两个)时,可以保证没有提交数据的字段使用数据库原来的数据 同时,@ModelAttribute注解的方法可以带或者不带返回值 - 带返回值{
System.out.println("testModelAttribute执行了...");
System.out.println(user);
return "success";
}
public User showUser(String uname){
System.out.println("showUser执行了...");
// 通过用户查询数据库(模拟)
User user = new User();
user.setUname(uname);
user.setAge(20);
user.setDate(new Date());
return user;
}https://er11.oss-cn-shenzhen.aliyuncs.com/img/image-20210316203238836.png)

- 不带返回值 此时需要我们提供一个**Map集合**去帮助我们设立映射关系{
System.out.println("testModelAttribute执行了...");
System.out.println(user);
return "success";
}
public void showUser(String uname, Map<String,User> map){
System.out.println("showUser执行了...");
// 通过用户查询数据库(模拟)
User user = new User();
user.setUname(uname);
user.setAge(20);
user.setDate(new Date());
map.put("test",user);
}https://er11.oss-cn-shenzhen.aliyuncs.com/img/image-20210316203824309.png)

SessionAttribute
- 作用:用于多次执行控制器方法之间的参数共享
success.jsp:
1 | <%@ page contentType="text/html;charset=UTF-8" language="java" isELIgnored="false" %> |
存 Session
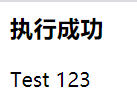
1 | <a href="anno/testSessionAttributes">testSessionAttributes</a> |
1 | /** |
上面是我们将信息存储到了 request 域中,但仍然没有存到 session 里,想要实现就得使用@SessionAttribute 注解,需要注意的是,要放在类上面不而不是方法上
1 | // 把msg=Test存入到session域对中 |
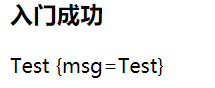
取 Session
1 | <a href="anno/getSessionAttributes">getSessionAttributes</a> |
1 | /** |
删 Session
1 | <a href="anno/delSessionAttributes">delSessionAttributes</a> |
1 | /** |
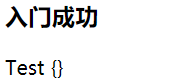
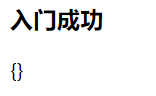
此时再执行 getSession 方法的话:
相应数据和结果视图
多种不同返回值情况
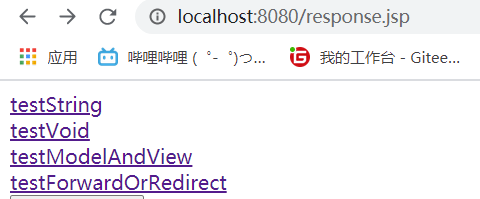
返回值为字符串
1 | <%@ page contentType="text/html;charset=UTF-8" language="java" isELIgnored="false" %> |
1 | <a href="user/testString" >testString</a> |
1 | /** |
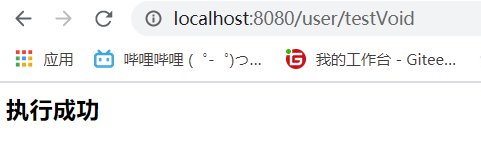
返回值为 void
1 | <a href="user/testVoid" >testVoid</a> |
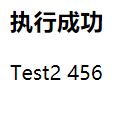
请求转发
1 | /** |
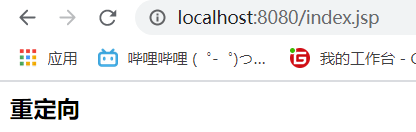
重定向
1 | /** |
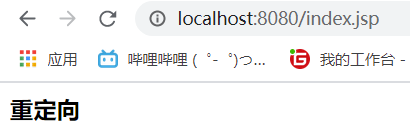
注意看浏览器 url 路径区别
直接用流输出
1 | @RequestMapping("/testVoid") |
返回值是 ModelAndView 对象
1 | <a href="user/testModelAndView" >testModelAndView</a> |
1 | /** |
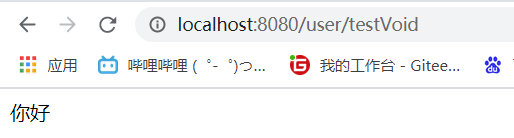
转发和重定向
1 | <a href="user/testForwardOrRedirect" >testForwardOrRedirect</a> |
转发
需要注意(在上面也提过了):如果用了 forward,路径要写成实际视图 url,而不能写成逻辑视图
也就是必须写完整,不能只写个
“success”这种其本质是相当于:
request.getRequestDispatcher("url").forward(request, respones);
1 |
|

重定向
- 需要注意,如果使用重定向到 JSP 页面的话,JSP 页面上不能写在
WEB-INF目录中的,不然不能找到 - 其本质相当于
response.senRedirect(url)
1 |
|
ResponseBody 响应 Json 数据
使用场景:使用@ResponseBody 将 controller 方法返回的对象转成json响应给客户端
相关 jar 包/依赖:
1
2
3
4
5
6
7
8
9
10
11
12
13
14
15<dependency>
<groupId>com.fasterxml.jackson.core</groupId>
<artifactId>jackson-databind</artifactId>
<version>2.9.0</version>
</dependency>
<dependency>
<groupId>com.fasterxml.jackson.core</groupId>
<artifactId>jackson-core</artifactId>
<version>2.9.0</version>
</dependency>
<dependency>
<groupId>com.fasterxml.jackson.core</groupId>
<artifactId>jackson-annotations</artifactId>
<version>2.9.0</version>
</dependency>设置静态资源不拦截的方法
1
2
3
4<!--前端控制器,哪些静态资源不拦截-->
<mvc:resources location="/css/" mapping="/css/**"/>
<mvc:resources location="/images/" mapping="/images/**"/>
<mvc:resources location="/js/" mapping="/js/**"/>User 对象:
1
2
3
4
5
6
7
8
9
10
11
12
13
14
15
16
17
18
19
20
21
22
23
24
25
26
27
28
29
30
31
32
33
34
35
36
37
38
39public class User implements Serializable{
private String username;
private String password;
private Integer age;
public String getUsername() {
return username;
}
public void setUsername(String username) {
this.username = username;
}
public String getPassword() {
return password;
}
public void setPassword(String password) {
this.password = password;
}
public Integer getAge() {
return age;
}
public void setAge(Integer age) {
this.age = age;
}
public String toString() {
return "User{" +
"username='" + username + '\'' +
", password='" + password + '\'' +
", age=" + age +
'}';
}
}发送 Ajax 请求,jsp 代码:
1
2
3
4
5
6
7
8
9
10
11
12
13
14
15
16
17
18
19
20
21
22
23
24
25
26
27
28
29
30
31
32<script>
// 页面加载,绑定单击事件
$(function(){
$("#btn").click(function(){
// alert("hello btn");
// 发送ajax请求
$.ajax({
// 编写json格式,设置属性和值
//表示发送请求的url字符串(路径) 也代表方法
url:"user/testAjax",
//发送信息至服务器内容的编码类型 这里选json
contentType:"application/json;charset=UTF-8",
//json的数据格式为{xxx:xxx}
data:'{"username":"hehe","password":"123","age":30}',
//数据类型
dataType:"json",
//请求方式
type:"post",
//成功后的回调函数 data表示数据
success:function(data){
// data服务器端响应的json的数据,进行解析
alert(data);
alert(data.username);
alert(data.password);
alert(data.age);
}
});
});
});
</script>控制器代码
1
2
3
4
5
6
7
8
9
10
11
12
13
14/**
* 模拟异步请求响应
*/
public User testAjax( User user){
System.out.println("testAjax方法执行了...");
// 客户端发送ajax的请求,传的是json字符串,后端把json字符串封装到user对象中
System.out.println(user);
// 做响应,模拟查询数据库
user.setUsername("TestAjax");
user.setAge(40);
// 做响应
return user;
}
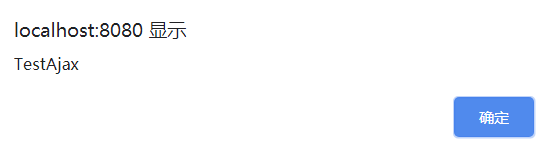
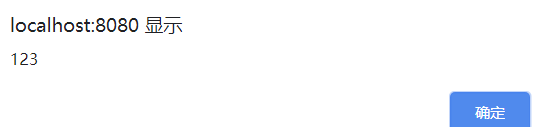

根据结果我们发现:前端打印的 username 和 age 都是我们控制器中模拟修改后的,而我们没有修改的密码还是 123;也就代表着,我们成功的把后端的数据包装成了 user 类,作为 json 数据传给了前端交由打印!
文件上传
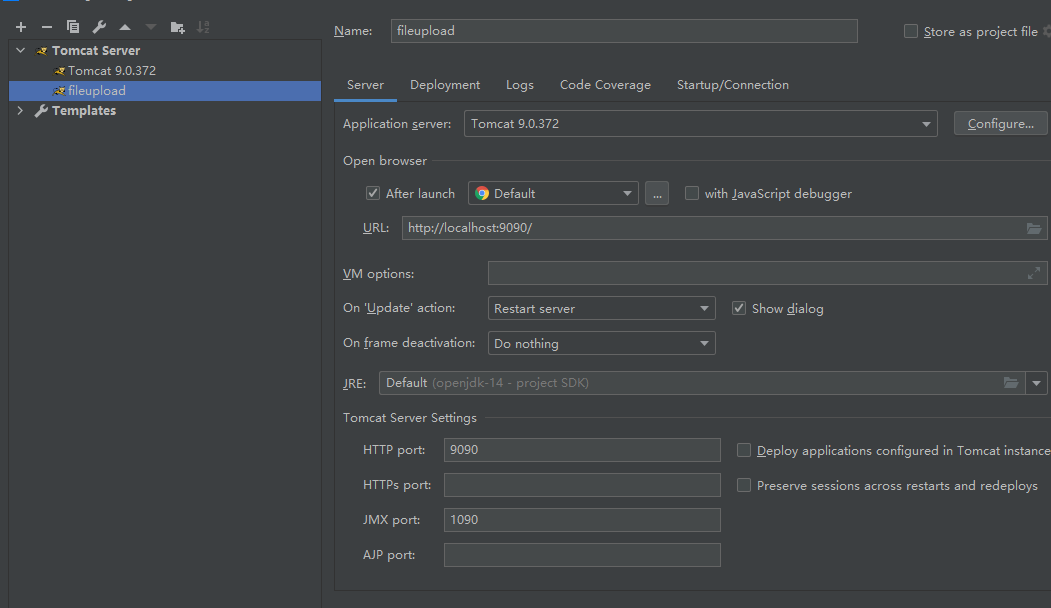
传统文件上传
导入依赖:
1
2
3
4
5
6
7
8
9
10<dependency>
<groupId>commons-fileupload</groupId>
<artifactId>commons-fileupload</artifactId>
<version>1.3.1</version>
</dependency>
<dependency>
<groupId>commons-io</groupId>
<artifactId>commons-io</artifactId>
<version>2.4</version>
</dependency>前端页面:
1
2
3
4
5<h3>文件上传</h3>
<form action="user/fileupload" method="post" enctype="multipart/form-data">
选择文件:<input type="file" name="upload"/><br/>
<input type="submit" value="上传文件"/>
</form>控制器代码
1
2
3
4
5
6
7
8
9
10
11
12
13
14
15
16
17
18
19
20
21
22
23
24
25
26
27
28
29
30
31
32
33
34
35
36
37
38
39
40
41
42
43
44
45/**
* 文件上传
* @return
*/
public String fileuoload1(HttpServletRequest request) throws Exception {
System.out.println("文件上传...");
// 使用fileupload组件完成文件上传
// 上传的位置
String path = request.getSession().getServletContext().getRealPath("/uploads/");
// 判断,该路径是否存在
File file = new File(path);
if(!file.exists()){
// 创建该文件夹
file.mkdirs();
}
// 解析request对象,获取上传文件项
//DiskFileItemFactory:磁盘文件项工厂
DiskFileItemFactory factory = new DiskFileItemFactory();
ServletFileUpload upload = new ServletFileUpload(factory);
// 解析request
List<FileItem> items = upload.parseRequest(request);
// 遍历
for(FileItem item:items){
// 进行判断,当前item对象是否是上传文件项
if(item.isFormField()){
// 说明普通表单向
}else{
// 说明上传文件项
// 获取上传文件的名称
String filename = item.getName();
// 把文件的名称设置唯一值,uuid
String uuid = UUID.randomUUID().toString().replace("-", "");
filename = uuid+"_"+filename;
// 完成文件上传
item.write(new File(path,filename));
// 删除临时文件
item.delete();
}
}
return "success";
}
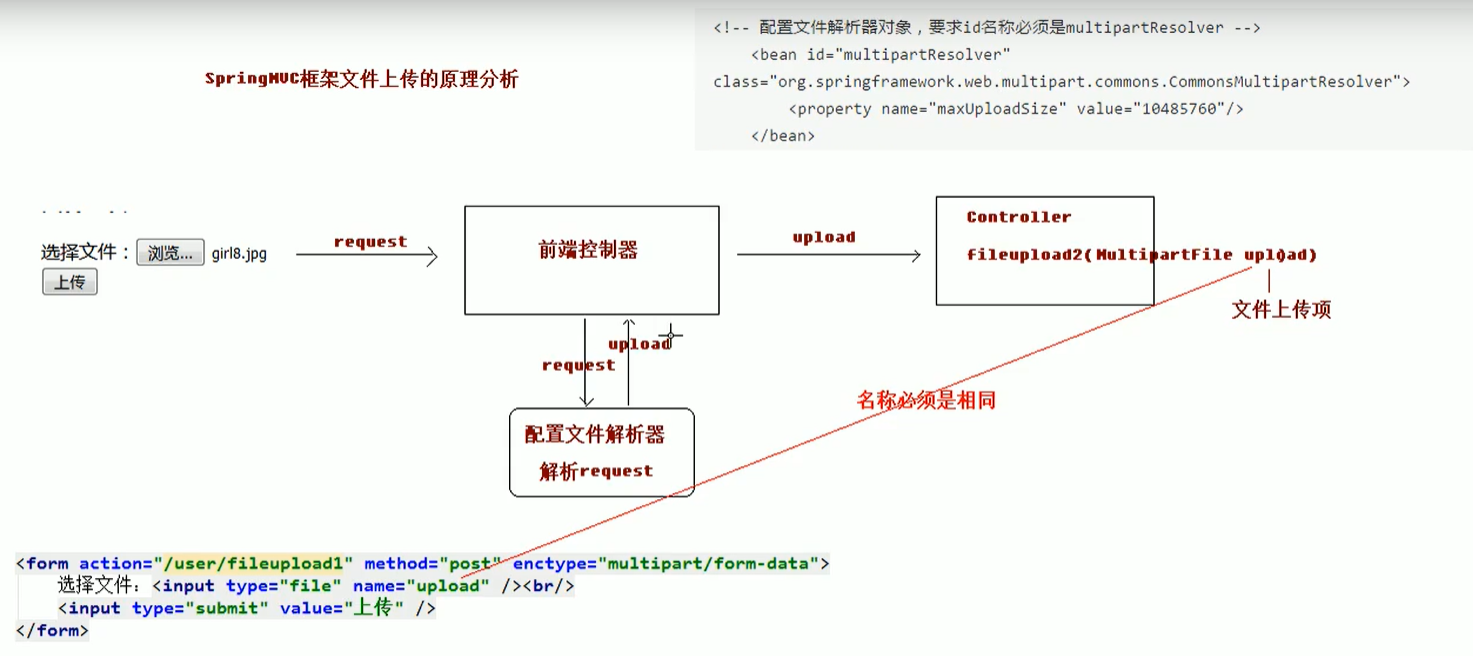
SpringMVC 传统方式文件上传
- 原理
依赖
1
2
3
4
5
6
7
8
9
10<dependency>
<groupId>commons-fileupload</groupId>
<artifactId>commons-fileupload</artifactId>
<version>1.3.1</version>
</dependency>
<dependency>
<groupId>commons-io</groupId>
<artifactId>commons-io</artifactId>
<version>2.4</version>
</dependency>控制器代码:
1 | /** |
配置文件解析器
1
2
3
4
5<!--配置文件解析器对象-->
<bean id="multipartResolver" class="org.springframework.web.multipart.commons.CommonsMultipartResolver">
<!--最大文件大小(10*1024*1024)-->
<property name="maxUploadSize" value="10485760" />
</bean>
SpringMVC 跨服务器方式文件上传
应用场景:
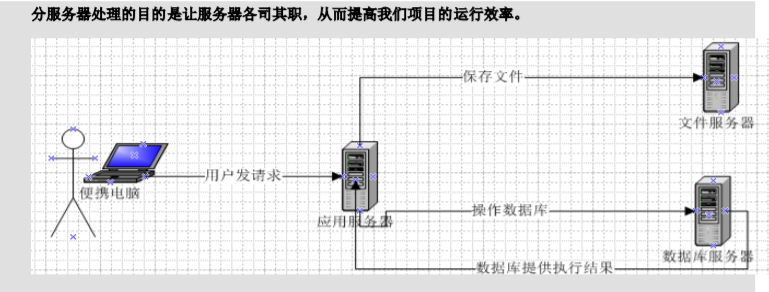
首先创建两个服务器(主机号端口号区别)
依赖:
1
2
3
4
5
6
7
8
9
10<dependency>
<groupId>com.sun.jersey</groupId>
<artifactId>jersey-core</artifactId>
<version>1.18.1</version>
</dependency>
<dependency>
<groupId>com.sun.jersey</groupId>
<artifactId>jersey-client</artifactId>
<version>1.18.1</version>
</dependency>控制器代码:
1 | /** |
SpringMVC 异常处理
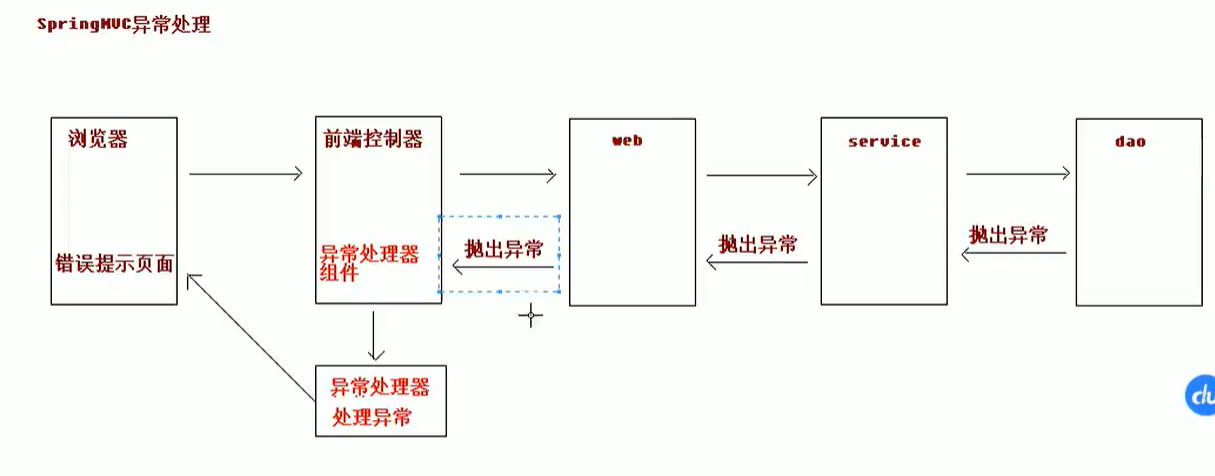
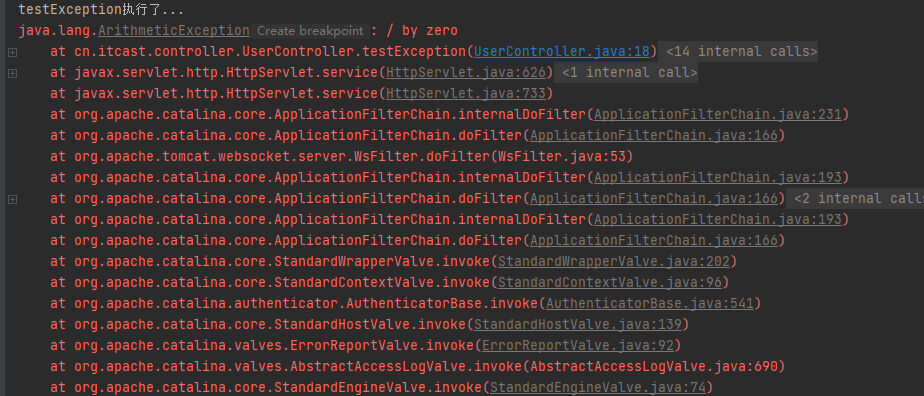
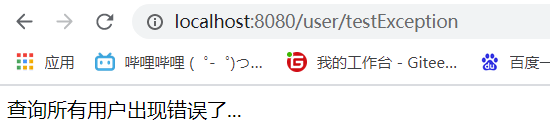
假如我们不去处理异常,那就会把异常信息直接打印在浏览器上,就不是很友好,因此我们需要去进行异常的处理
为了去进行异常处理,我们需要完成以下几步:
编写自定义异常类(用于做信息的提示)
1
2
3
4
5
6
7
8
9
10
11
12
13
14
15
16
17
18
19
20
21/**
* 自定义异常类
*/
public class SysException extends Exception{
// 存储提示信息的
private String message;
public String getMessage() {
return message;
}
public void setMessage(String message) {
this.message = message;
}
public SysException(String message) {
this.message = message;
}
}编写异常处理器(进行异常的处理)
在这一步,我们需要去完成以下几件事
- 定义异常信息/定义异常
- 判断传进来的异常类型
- 如果是的自定义异常,就读取异常信息
- 其余情况就视情况而定
- 创建 ModelAndView 对象,用于封装异常信息
- 给异常信息赋值
- 给 ModelAndView 对象中的视图设置转发目的地
1
2
3
4
5
6
7
8
9
10
11
12
13
14
15
16
17
18
19
20
21
22
23
24
25
26
27
28
29/**
* 异常处理器
*/
public class SysExceptionResolver implements HandlerExceptionResolver{
/**
* 处理异常业务逻辑
* @param request
* @param response
* @param handler
* @param ex
* @return
*/
public ModelAndView resolveException(HttpServletRequest request, HttpServletResponse response, Object handler, Exception ex) {
// 获取到异常对象
SysException e = null;
if(ex instanceof SysException){
e = (SysException)ex;
}else{
e = new SysException("系统正在维护....");
}
// 创建ModelAndView对象
ModelAndView mv = new ModelAndView();
mv.addObject("errorMsg",e.getMessage());
mv.setViewName("error");
return mv;
}
}配置异常处理器(跳转到提示页面)
1
2<!--配置异常处理器-->
<bean id="sysExceptionResolver" class="cn.itcast.exception.SysExceptionResolver"/>
测试一下:
发生异常时的前端页面:
1 | <%@ page contentType="text/html;charset=UTF-8" language="java" isELIgnored="false" %> |

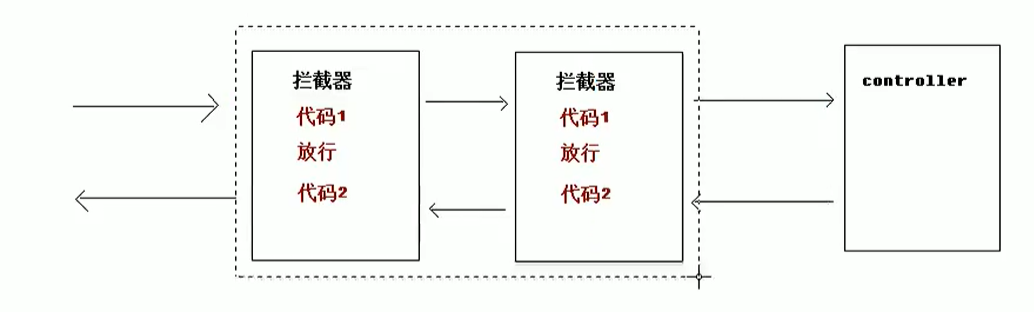
Interceptor
SpringMVC 中的处理器拦截器类似于Servlet开发中的过滤器 Filter
功能:对处理器进行预处理和后处理
多个拦截器还能形成拦截器链:即将拦截器按照一定的顺序联结成一条链,在访问被拦截的方法或字段时,拦截器链中的拦截器能按照之前定义的顺序被调用
拦截器与过滤器的区别:

自定义 Intercept
想要去自定义拦截器,主要分为两步
编写一个类去实现
HandlerInterceptoe接口在这个类中我们有三个方法:
preHandle\postHandle\afterCompletion分别代表:预处理 后处理1
2
3
4
5
6
7
8
9
10
11
12
13
14
15
16
17
18
19
20
21
22
23
24
25
26
27
28
29
30
31
32
33
34
35
36
37
38
39
40
41
42
43
44
45
46
47
48/**
* 自定义拦截器
*/
public class MyInterceptor1 implements HandlerInterceptor{
/**
* 预处理,controller方法执行前
* return true 放行,执行下一个拦截器,如果没有,执行controller中的方法
* return false不放行 可以让跳转到错误页面
* @param request
* @param response
* @param handler
* @return
* @throws Exception
*/
public boolean preHandle(HttpServletRequest request, HttpServletResponse response, Object handler) throws Exception {
System.out.println("MyInterceptor1预处理执行");
//请求转发
// request.getRequestDispatcher("/WEB-INF/pages/error.jsp").forward(request,response);
return true;
}
/**
* 后处理方法,controller方法执行后,success.jsp执行之前
* @param request
* @param response
* @param handler
* @param modelAndView
* @throws Exception
*/
public void postHandle(HttpServletRequest request, HttpServletResponse response, Object handler, ModelAndView modelAndView) throws Exception {
System.out.println("MyInterceptor1后处理执行了");
// request.getRequestDispatcher("/WEB-INF/pages/error.jsp").forward(request,response);
}
/**
* success.jsp页面执行后,该方法会执行
* @param request
* @param response
* @param handler
* @param ex
* @throws Exception
*/
public void afterCompletion(HttpServletRequest request, HttpServletResponse response, Object handler, Exception ex) throws Exception {
System.out.println("MyInterceptor1最后处理执行了");
}
}配置拦截器
1
2
3
4
5
6
7
8
9
10
11
12
13
14
15
16
17
18
19
20
21
22
23
24
25<!--配置拦截器-->
<mvc:interceptors>
<!--配置拦截器-->
<mvc:interceptor>
<!--要拦截的具体的方法-->
<!--如果是/**就表示全部方法-->
<mvc:mapping path="/user/*"/>
<!--不要拦截的方法
<mvc:exclude-mapping path=""/>
-->
<!--配置拦截器对象-->
<bean class="cn.itcast.controller.cn.itcast.interceptor.MyInterceptor1" />
</mvc:interceptor>
<!--配置第二个拦截器-->
<mvc:interceptor>
<!--要拦截的具体的方法-->
<mvc:mapping path="/**"/>
<!--不要拦截的方法
<mvc:exclude-mapping path=""/>
-->
<!--配置拦截器对象-->
<bean class="cn.itcast.controller.cn.itcast.interceptor.MyInterceptor2" />
</mvc:interceptor>
</mvc:interceptors>
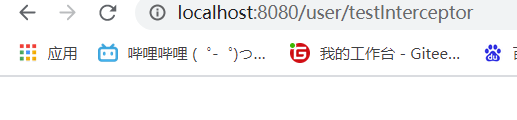
测试:
1 |
|
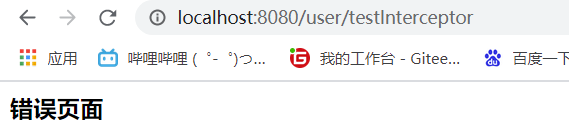
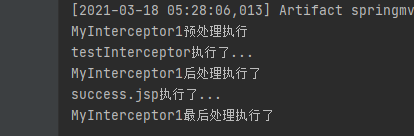
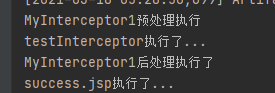
预处理
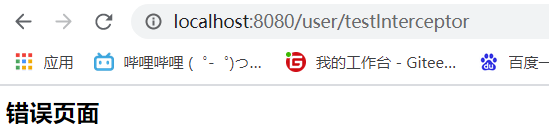
当设置为 return false,但是不进行请求转发时:
当设置为 return false,且进行请求转发时:
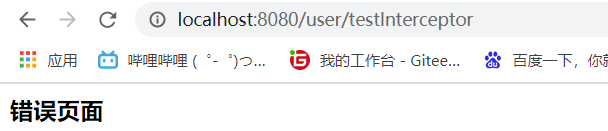
打印台:

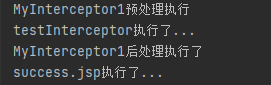
当设置为 return true,且进行请求转发时:
打印台:
后处理
假如我们启用了请求转发,即:就算放行了,但依旧让转发到错误页面的话:
最后处理
通常是进行一些流的关闭

下面进行一下链的测试,我们编写第二个拦截器
1
2
3
4
5
6
7
8
9
10
11
12
13
14
15
16
17
18
19
20
21
22
23
24
25
26
27
28
29
30
31
32
33
34
35
36
37
38
39
40
41
42
43
44public class MyInterceptor2 implements HandlerInterceptor{
/**
* 预处理,controller方法执行前
* return true 放行,执行下一个拦截器,如果没有,执行controller中的方法
* return false不放行
* @param request
* @param response
* @param handler
* @return
* @throws Exception
*/
public boolean preHandle(HttpServletRequest request, HttpServletResponse response, Object handler) throws Exception {
System.out.println("MyInterceptor2执行了 预处理");
// request.getRequestDispatcher("/WEB-INF/pages/error.jsp").forward(request,response);
return true;
}
/**
* 后处理方法,controller方法执行后,success.jsp执行之前
* @param request
* @param response
* @param handler
* @param modelAndView
* @throws Exception
*/
public void postHandle(HttpServletRequest request, HttpServletResponse response, Object handler, ModelAndView modelAndView) throws Exception {
System.out.println("MyInterceptor2执行了 后处理");
// request.getRequestDispatcher("/WEB-INF/pages/error.jsp").forward(request,response);
}
/**
* success.jsp页面执行后,该方法会执行
* @param request
* @param response
* @param handler
* @param ex
* @throws Exception
*/
public void afterCompletion(HttpServletRequest request, HttpServletResponse response, Object handler, Exception ex) throws Exception {
System.out.println("MyInterceptor2执行了 最后处理");
}
}然后配置好,测试:

从结果,我们可以看出来是个U 型的打印顺序