关于 Spring
Spring 官网:https://spring.io/
What can Spring do?
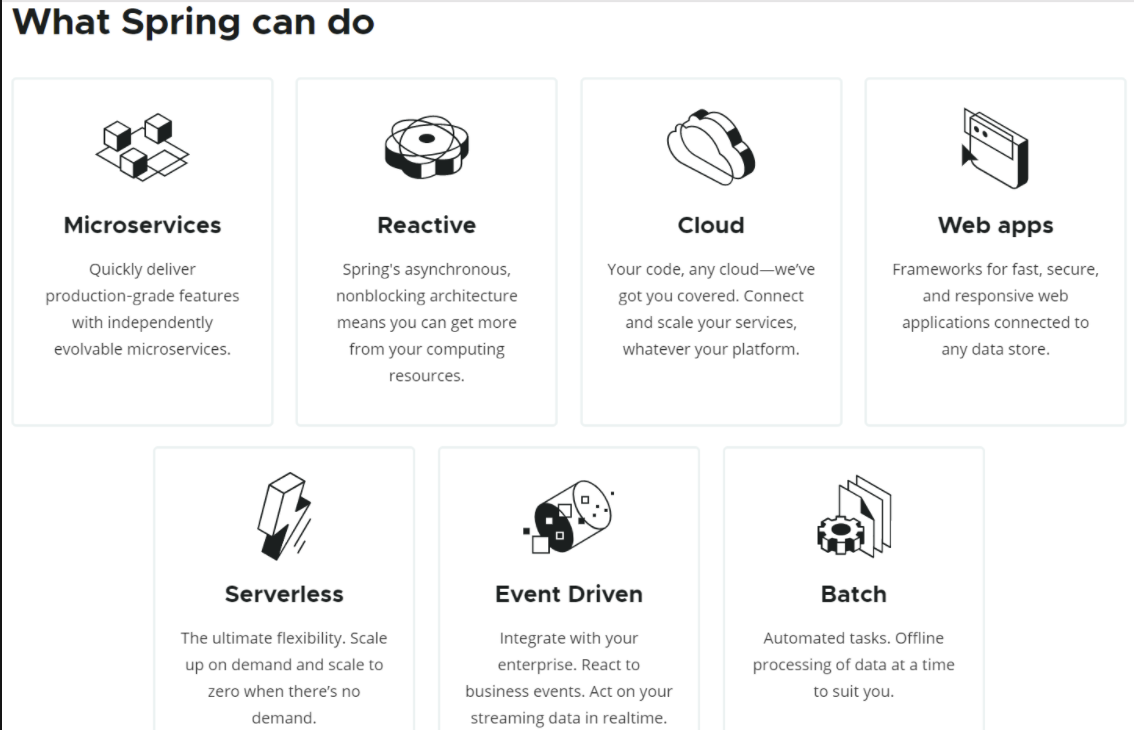
Spring 生态
- https://spring.io/projects/spring-boot
- 生态覆盖以下几个部分
- web 开发
- 数据访问
- 安全控制
- 分布式
- 消息服务
- 移动开发
- 批处理
- and so on
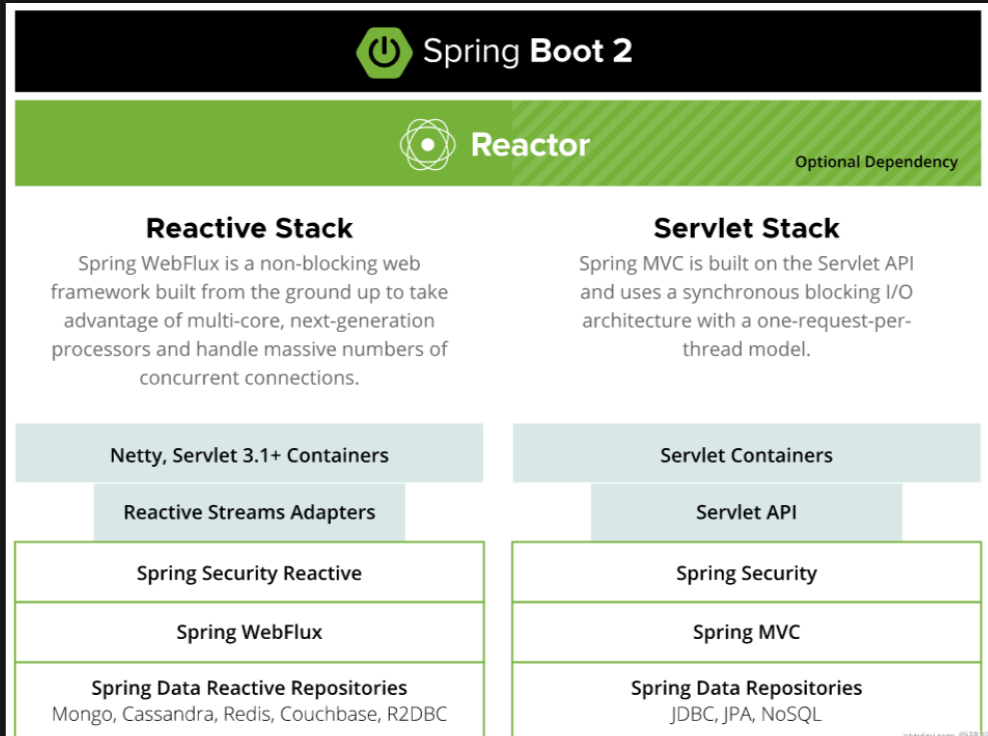
Spring5
响应式编程
关于 SpringBoot
Why SpringBoot?
Spring Boot makes it easy to create stand-alone, production-grade Spring based Applications that you can “just run”.
能快速创建出生产级别的 Spring 应用
SpringBoot 优点
Create stand-alone Spring applications
- 创建独立 Spring 应用
Embed Tomcat, Jetty or Undertow directly (no need to deploy WAR files)
- 内嵌 web 服务器
Provide opinionated ‘starter’ dependencies to simplify your build configuration
- 自动 starter 依赖,简化构建配置
Automatically configure Spring and 3rd party libraries whenever possible
- 自动配置 Spring 以及第三方功能
Provide production-ready features such as metrics, health checks, and externalized configuration
- 提供生产级别的监控、健康检查及外部化配置
Absolutely no code generation and no requirement for XML configuration
- 无代码生成、无需编写 XML
时代背景
基于微服务以及分布式
微服务
- 微服务是一种架构风格
- 一个应用拆分为一组小型服务
- 每个服务运行在自己的进程内,也就是可独立部署和升级
- 服务之间使用轻量级 HTTP 交互
- 服务围绕业务功能拆分
- 可以由全自动部署机制独立部署
- 去中心化,服务自治。服务可以使用不同的语言、不同的存储技术
分布式
分布式的困难之处
- 远程调用
- 服务发现
- 负载均衡
- 服务容错
- 配置管理
- 服务监控
- 链路追踪
- 日志管理
- 任务调度
- …
分布式解决
- SpringBoot + SpringCloud
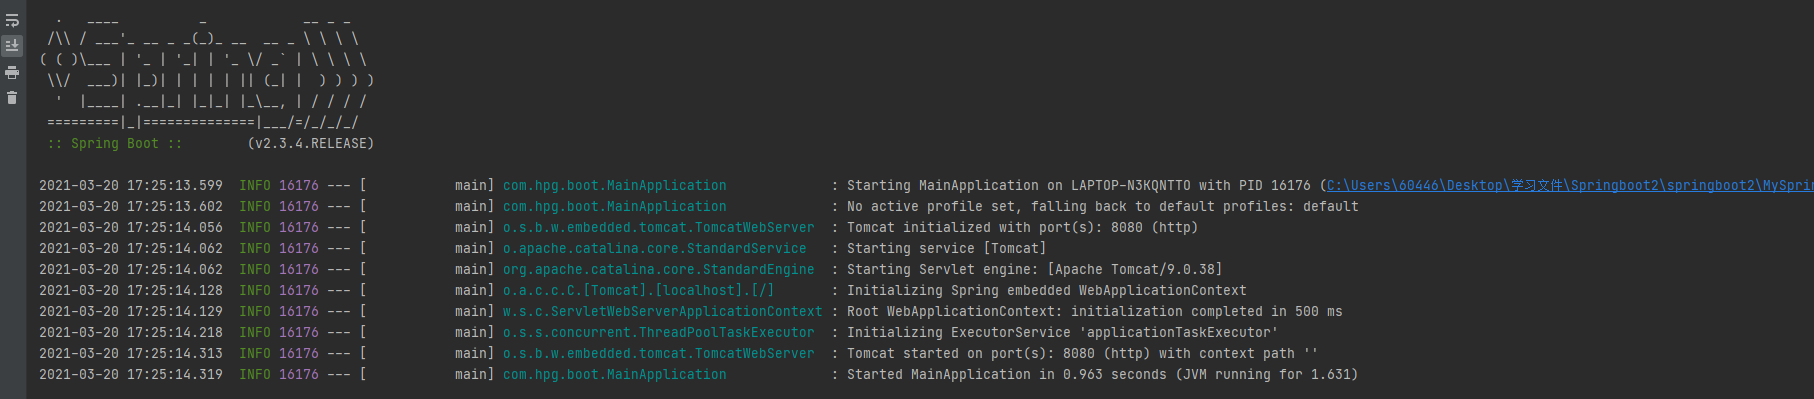
HelloSpringBoot
下面我们来体验一下 SpringBoot 开发吧
引入依赖
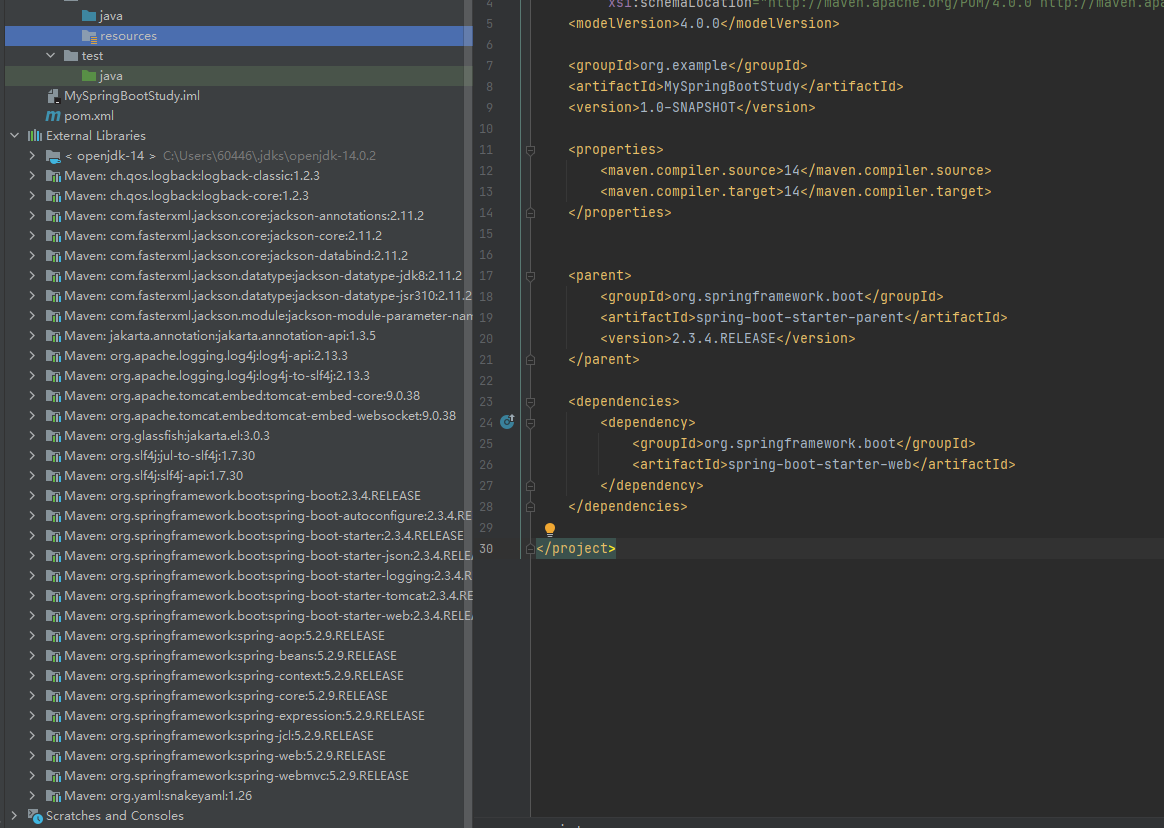
首先创建 maven 工程,引入依赖:
1 | <parent> |
我们发现 仅仅导入这两个依赖 就有了大量的 jar 包
创建主程序
1 | import org.springframework.boot.SpringApplication; |
编写业务
这里的@RestController是我们之前所学的@Controller和@ResponseBody的合体
1 | import org.springframework.web.bind.annotation.RequestMapping; |
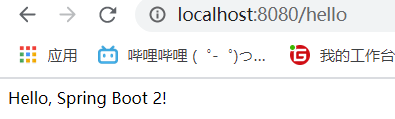
测试
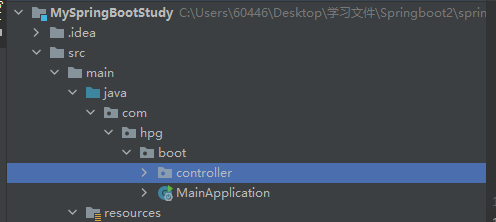
需要注意,我们的启动类需要和controller 包放在相同跟目录
也就是,我们的启动类需要大于 controller 类,否则的话:

Extra
配置的进行
我们可以在 resource 的包下建立:application.properties
在其中进行一些属性的设置(包括端口号等)
简化部署
引入依赖:
1 | <build> |
项目可以被打包成 jar 包,放在目标服务器执行就可以
SpringBoot 特点
依赖管理
父项目进行了依赖管理,因此我们无需去关注版本号,自动进行了版本的仲裁
1
2
3
4
5
6
7
8
9
10
11
12
13
14依赖管理
<parent>
<groupId>org.springframework.boot</groupId>
<artifactId>spring-boot-starter-parent</artifactId>
<version>2.3.4.RELEASE</version>
</parent>
他的父项目
<parent>
<groupId>org.springframework.boot</groupId>
<artifactId>spring-boot-dependencies</artifactId>
<version>2.3.4.RELEASE</version>
</parent>有的人会问了,那我就想用一个特定的版本怎么办?我们可以去修改默认的版本号(pom.xml 中修改)
1
2
3<properties>
<mysql.version>5.1.43</mysql.version>
</properties>
同时,我们注意到一个细节,我们的引入的两个包都叫做spring-boot-starter-xxx
这究竟是什么呢?我们称之为:应用程序启动器,我们要引入什么场景,就直接找这个 starter 然后引入就好了
SpringBoot 支持的场景:https://docs.spring.io/spring-boot/docs/current/reference/html/using-spring-boot.html#using-boot-starter
而所有场景最基本的启动器是:
1 | <dependency> |
自动配置
当我们成功运行了第一个 SpringBoot 程序的时候,我们肯定是很惊喜的。
天,我们之前不是还要配置 Tomcat 吗?我们不是还要配置 UTF 字符编码的过滤器吗?不是还要去配置 SpringMVC 的前端解析器之类的吗?
我们怎么跑了个 main 方法就直接能在服务器上出现效果了呢?这就多亏了 SpringBoot 的自动配置
依赖自动配置
以 Tomcat 为例:
我们点开
1
2
3
4<dependency>
<groupId>org.springframework.boot</groupId>
<artifactId>spring-boot-starter-web</artifactId>
</dependency>进入到这个 web 依赖中,可以发现,他确实帮我们配置了 Tomcat。
1
2
3
4
5
6<dependency>
<groupId>org.springframework.boot</groupId>
<artifactId>spring-boot-starter-tomcat</artifactId>
<version>2.3.4.RELEASE</version>
<scope>compile</scope>
</dependency>同理,我们再看看 SpringMVC 的组件,发现他也帮我们引入了
1
2
3
4
5
6
7
8
9
10
11
12<dependency>
<groupId>org.springframework</groupId>
<artifactId>spring-web</artifactId>
<version>5.2.9.RELEASE</version>
<scope>compile</scope>
</dependency>
<dependency>
<groupId>org.springframework</groupId>
<artifactId>spring-webmvc</artifactId>
<version>5.2.9.RELEASE</version>
<scope>compile</scope>
</dependency>那我们就来验证一下看看 SpringBoot 有没有帮我们引入 SpringMVC 相关组件吧
我们编写一段代码,来看看其中的组件
1
2
3
4
5
6
7
8
9
10
11
12
13
14
public class MainApplication {
public static void main(String[] args) {
//1、返回我们IOC容器
ConfigurableApplicationContext run = SpringApplication.run(MainApplication.class, args);
//2、查看容器里面的组件
String[] names = run.getBeanDefinitionNames();
for (String name : names) {
System.out.println(name);
}
}
}我们可以从打印结果(截取了一部分)中看出来,确实,容器中的的确确有我们需要的组件
1
2
3
4
5
6
7
8
9
10
11
12
13
14
15
16
17前端视图解析器
org.springframework.boot.autoconfigure.web.servlet.DispatcherServletAutoConfiguration$DispatcherServletConfiguration
dispatcherServlet
视图解析器
org.springframework.boot.autoconfigure.web.servlet.WebMvcAutoConfiguration$WebMvcAutoConfigurationAdapter
defaultViewResolver
viewResolver
json相关
org.springframework.boot.autoconfigure.jackson.JacksonAutoConfiguration
jsonComponentModule
字符集过滤器
org.springframework.boot.autoconfigure.web.servlet.HttpEncodingAutoConfiguration
characterEncodingFilter
localeCharsetMappingsCustomizer
包扫描自动配置
想一想,我们 SSM 开发中经常要进行一件什么事?给一个 hint:
<context:component-scan base-package="com.xxxx" >对的,我们要进行包的扫描说明;但我们上述并没有经过这一流程啊,SpringBoot 又是怎么帮我们简化了这一步的呢?原来啊,是 SpringBoot 规定了:主程序所在包及其下面的所有子包里面的组件都会被默认扫描进来!因此无需进行包扫描配置啦
那我们想要改变扫描路径又该怎么办呢?假如我们的主程序不符合上述包结构位置
我们就需要使用
@SpringBootApplication(scanBasePackages = "")进行扫描位置放大了或者使用
@ComponentScan指定扫描路径,但需要和另外 2 个注解配合使用:1
2
3
4
5
等价于
默认值自动配置
各种配置拥有默认值
- 默认配置最终都是映射到某个类上,如:MultipartProperties
- 配置文件的值最终会绑定每个类上,这个类会在容器中创建对象
场景自动配置
我其实一开始学习 SpringBoot 就有这个疑惑了,哇,我添加一个 starter,他包含了这么多相关的依赖,那我开一个非常简单的程序,假如所有 starter 都启动,那不得卡死,但我写了第一个 SpringBoot 程序后发现并没有,速度很快。原来 SpringBoot 是有着按需加载自动配置项(starter)的性质的
SpringBoot 的自动配置功能依赖于:
1 | <dependency> |
容器组件
回忆 Spring
回忆一下,没接触过 SpringBoot 之前,我们的组件(对象)是怎么交由 Spring 托管的呢?
我们创建了一个 xml 文件,然后在里面设置值,如下:
1 |
|
Springboot 实现
组件添加
@Configuration
- 作用:声明一个类为配置类
下列代码的作用:就是告诉 SpringBoot 这个类是一个配置类啦,里面以后就需要写一些我们的数据连接池之类的配置文件啦。以后其作用等同于 xm
1 |
|
@Bean
作用:声明在一个方法上面,用于给容器中添加组件,要注意:此时方法名就是组件的 id,返回类型是组件类型,返回值为组件在容器中的实例!
当然了如果不想让组件 id 为方法名的话,可以
@Bean("xxxx")自己给它取一个
下列方法的作用:
1 |
|
我们打印一下容器中组件:
那我们再测试一下容器中的组件符合不符合我们之前学习的,要符合单例的原则呢?
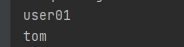
1 | Pet tom01 = run.getBean("tom", Pet.class); |

ok 啦,是同一个。
那我们的配置类:MyConfig.class是不是一个组件呢?
1 | MyConfig bean = run.getBean(MyConfig.class); |
打印结果:com.hpg.boot.config.MyConfig$$EnhancerBySpringCGLIB$$5b53d985@10a95ae9
是的 他也是个组件
proxyBeanMethods
在@Bean 注解中有一个很有意思的属性:proxyBeanMethods = true/false
他有什么用呢?先不急,我们测试一段代码
- 先置 proxyBeanMethods = true
作用是先获取一个配置类对象,再取配置类对象中的 2 个对象(与上面的取法是不同的,要注意)
接着判断这两个对象是否相同
1 | MyConfig bean = run.getBean(MyConfig.class); |
结果是:true,说明这两个 user 是同一个对象
而根据打印 bean 的语句:com.hpg.boot.config.MyConfig$$EnhancerBySpringCGLIB$$5b53d985@10a95ae9 我们还发现我们 bean 对象是一个代理对象
说明对象是同一个对象,也就是单例的;
- 再置 proxyBeanMethods = flase
结果是 false,说明并不是同一个对象
此时打印出来的 bean:com.hpg.boot.config.MyConfig@304a9d7b
因此发现此时的 bean 对象并不是一个代理对象;
那么这个 proxyBeanMethods 有什么用呢?
我们在 User 类中添加 Pet 对象及其 Getter Setter 方法
1 | private Pet pet; |
同时,我们在配置类中添加一下 SetPet 的环节
1 | //给容器中添加组件。以方法名作为组件的id。返回类型就是组件类型。返回的值,就是组件在容器中的实例 |
同时,我们进行一下测试:
1 | User user01 = run.getBean("user01", User.class); |
打印结果:用户的宠物:true
而假如我们设置 proxyBeanMethods = false
打印的结果:用户的宠物:false
- Full(proxyBeanMethods = true)【保证每个@Bean方法被调用多少次返回的组件都是单实例的】
- Lite(proxyBeanMethods = false)【每个@Bean方法被调用多少次返回的组件都是新创建的】
- 组件依赖必须使用Full模式默认。其他默认是否Lite模式
@Component、@Controller、@Service、@Repository
这些注解依旧有用,这里不再复述各个注解的作用了
@ComponentScan @Import
- @ComponentScan:包扫描注解,这个是之前就讲过的,总的来说就是告诉 Spring 要在哪里找到 Bean
- @Import:给容器中自动创建出这对应类型的组件、默认组件的名字就是全类名
测试一下@Import 吧:
在 MyConfig 上添加:@Import({User.class, DBHelper.class})
1 | //5、获取组件 |
打印结果:
com.hpg.boot.bean.User
user01
ch.qos.logback.core.db.DBHelper@2aa27288
解释一下:第一个是通过@import 注入的,而 user01 是通过@Bean 组件注入的
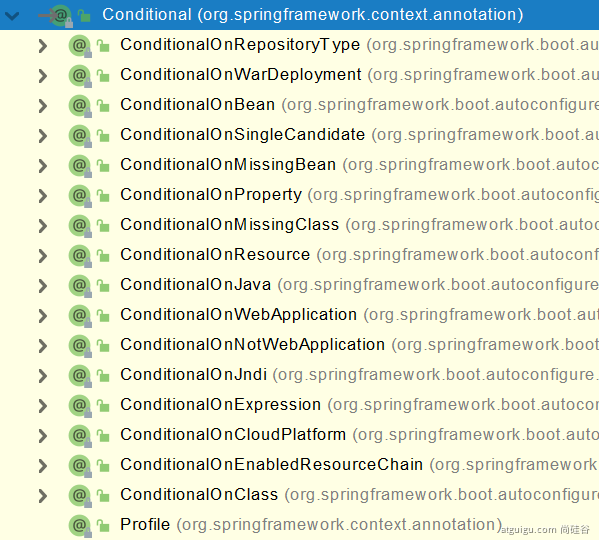
@Conditional
- 条件装配:满足 Conditional 指定的条件,则进行组件注入
下满测试一下:
1 | //告诉SpringBoot这是一个配置类 == 配置文件@ConditionalOnBean(name = "tom") |
我们使用了一个条件注解:@ConditionalOnBean(name = "tom")
告诉容器中假如有一个 tom 组件的时候,下面的 bean 才都生效(注入);
测试代码:
1 | boolean tom = run.containsBean("tom"); |
打印结果:
容器中 Tom 组件:false
容器中 user01 组件:false
容器中 tom1 组件:false
同样的,这个注解可以加在方法上,假如两个 bean 存在注入关系的话,同样适用;
我们还可以使用@ConditionalOnMissingBean(name = “tom”)
表示如果不存在 tom 这个组件,就帮我们注入;
打印结果是:
容器中 Tom 组件:false
容器中 user01 组件:true
容器中 tom1 组件:true
原生配置文件引入
假如有一些 bean 放在了 xml 文件中,我们怎么添加到容器中呢?
答案是通过@ImportResource()去引入

比如有一个 beans.xml 在资源包下,我们可以通过@ImportResource("classpath:beans.xml")去引入
配置绑定
想一想,我们如何使用 Java 去读取 Properties 文件中的内容封装到 JavaBean 中呢?
- new 一个 Properties 类
- 将配置文件读成一个流的形式
- 通过这类的 load 方法导入流
举个例子吧:
1 | driver=com.mysql.cj.jdbc.Driver |
1 | private static String driver; |
@Component + @ConfigurationProperties
有个 Car 类:
1 |
|
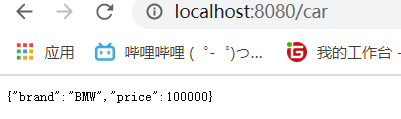
然后在 application.properties 中有着两个属性:
1 | =BMW |
控制器:
1 |
|
@EnableConfigurationProperties + @ConfigurationProperties
我们可以在配置类中添加@EnableConfigurationProperties(目标类.class)的方式去取代@Component
举个例子:
1 |
|
这段代码的作用就是:
- 开启 Car 配置绑定功能
- 把这个 Car 这个组件自动注册到容器中
当然,别忘了,@ConfigurationProperties 还是得老老实实的配好:@ConfigurationProperties(prefix = "mycar") 不能忘掉
自动配置原理
学习嘛,不能只知道其用法,而不知道其原理,我们上述学习了多个自动配置的注解;
下面就来深入(?)得看看究竟这个神奇的自动配置是怎么实现的。
自动配置【自动包扫描规则 + 自动类加载】
我们知道,我们的神奇的 SpringBoot 程序是由@SpringBootApplication注解去开启的,我们点开这个注解看看:
发现这个注解是一个【复合注解】,由
@SpringBootConfiguration
@EnableAutoConfiguration
@ComponentScan这三个注解构成;(当然还有上面省略的一些啦)
1
2
3
4
5
6
7
8
9
10
11
12
13//省略了一些别的注解
public SpringBootApplication {//省略其中内容}上述内容也证明了我们所说的:
1
2
3
4
5
等价于
@SpringBootConfiguration
下面就逐行分析,先分析第一个:@SpringBootConfiguration
1 |
|
@Target({ElementType.TYPE}):注解的作用目标是接口、类、枚举
@Retention(RetentionPolicy.RUNTIME):告诉注解保留的位置,这里的参数是 RUNTIME,说明的是:注解会在 class 字节码文件中存在,在运行时可以通过反射获取到
@Documented:说明该注解将被包含在 javadoc 中
@Configuration:这就是我们需要注意的了,这个注解的作用是声明当前的类是一个配置类。
其作用是:标注在类上,配置 spring 容器(应用上下文)。相当于把该类作为 spring 的 xml 配置文件中的
<beans>。说人话,就是 Spring 将扫描加了@Configuration的类,读取其中配置信息;
通过上述解读(其实最关键的就是最后一个注解),@SpringBootConfiguration就是@Configuration一个延伸,告诉这个类是SpringBoot 应用配置类;
@EnableAutoConfiguration(关键)
我们点开这个注解,果不其然 又是一个【复合注解】
1 |
|
头四个注解我们已经说腻了,就不说了,重点关注后两个:
1 |
@AutoConfigurationPackage
1 |
|
我们关注一下,@Import(AutoConfigurationPackages.Registrar.class) 这行,@Import 注解我们上面学过了,知道其作用是导入组件,在这里它导入的是一个叫Registerclass 文件,这个Register又是什么呢?
1 | static class Registrar implements ImportBeanDefinitionRegistrar, DeterminableImports { |
我们重点关注一下这段代码做了什么事:
1 | public void registerBeanDefinitions(AnnotationMetadata metadata, BeanDefinitionRegistry registry) { |
metadata是注解的元信息,包括注解作用的位置啊,类型等

registry

是一个 BeanFactory
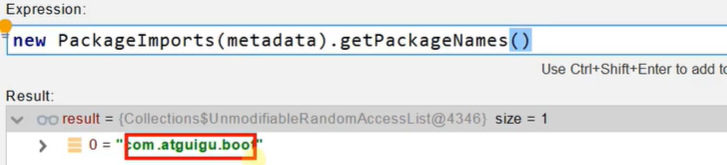
那么 register 方法中的第二个参数:
new AutoConfigurationPackages.PackageImports(metadata)).getPackageNames().toArray(new String[0])
这代表着什么呢?我们查找一下看看,发现其值是一个包名;
也就是把包名最终封装到了一个数组里面
好啦,现在我们清楚了参数:一个是 bean 工厂,一个是包的数组
那么这个 register 方法做了什么事情呢?它进行了 bean 的注册
1 | public static void register(BeanDefinitionRegistry registry, String... packageNames) { |
至此,我们明白了@AutoConfigurationPackage 的作用:
就是将指定的一个包下的所有组件导入进来。还记得我们在哪里用的这个注解吗?对的 MainApplication
这也就侧面说明了,为什么我们的启动类的位置必须是控制器等类所在包同级别的原因了!(因为要扫描包嘛)
@Import({AutoConfigurationImportSelector.class})
我们不关心@Import 注解,只需要知道其作用是导入组件,因此我们就需要研究导入的:
AutoConfigurationImportSelector.class
究竟是何方神圣即可;
我们点进这个类,找到以下这段代码:
1 | public String[] selectImports(AnnotationMetadata annotationMetadata) { |
其作用是决定要给容器中导入哪些组件;它的返回值是通过
getAutoConfigurationEntry(annotationMetadata); 这个方法去得到自动配置信息,再通过getConfigurations()方法去获取配置信息 转成数组形式返回
因此,只要弄清楚getAutoConfigurationEntry(annotationMetadata)方法就好了
1 | protected AutoConfigurationImportSelector.AutoConfigurationEntry getAutoConfigurationEntry(AnnotationMetadata annotationMetadata) { |
调用List<String> configurations = getCandidateConfigurations(annotationMetadata, attributes)获取到所有需要导入到容器中的配置类
我们 Step in 这个方法去看看是怎么实现的:
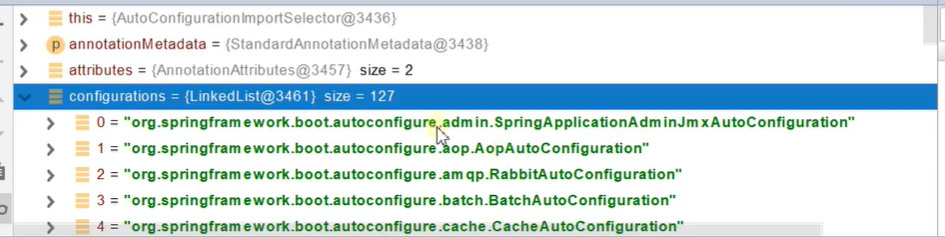
1 | protected List<String> getCandidateConfigurations(AnnotationMetadata metadata, AnnotationAttributes attributes) { |
在这个loadFactoryNames中其本质:是利用工厂加载 Map<String, List<String>> loadSpringFactories(@Nullable ClassLoader classLoader);得到所有的组件
深究一下,资源文件的获取是通过获取的
1 | Enumeration<URL> urls = classLoader != null ? classLoader.getResources("META-INF/spring.factories") : ClassLoader.getSystemResources("META-INF/spring.factories"); |
也就是说:从META-INF/spring.factories位置来加载一个文件。
默认扫描我们当前系统里面所有META-INF/spring.factories位置的文件
spring-boot-autoconfigure-2.3.4.RELEASE.jar包里面也有META-INF/spring.factories
我们点进去这个 facotories 文件,找到自动配置相关信息:
1 | 文件里面写死了spring-boot一启动就要给容器中加载的所有配置类 |
@ComponentScan
在这注解中有这么一段话:
配置组件扫描的指令。提供了类似与<context:component-scan>标签的作用
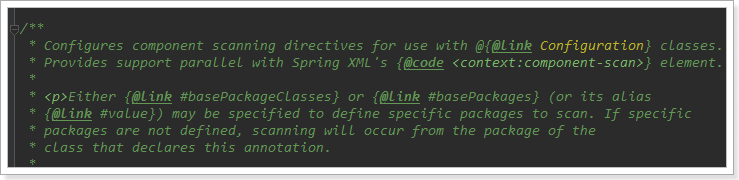
通过 basePackageClasses 或者 basePackages 属性来指定要扫描的包。如果没有指定这些属性,那么将从声明这个注解的类所在的包开始,扫描包及子包
联想一下我们之前学习的,@SpringBootApplication 注解所标注的就是 main 的启动项,扫描的话就会扫描这个类的包和其子包;再次证明了启动类所在的目录结构位置应该放在控制层等包之前;
按需开启自动配置
想一想,我们上面说的@import 导入的包这么多,难道我们全都会自动配置上吗?
答案是否定的,利用了@Condition 注解,我们能够按照条件装配规则进行按需配置
比如AopAutoConfiguration类中,就设定了一定要引入 spring.aop 场景,该配置才会生效;
1 |
|
自动配置【自动配置流程】
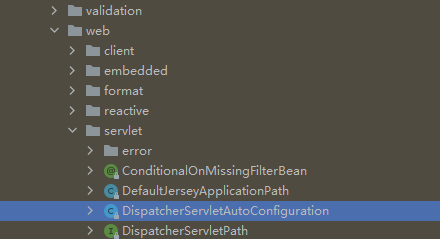
在这个包下有许多我们的功能组件

我们找到DispatcherServletAutoConfiguration,以此为例来看看自动配置的运行流程
这个类上有四个注解:
1 |
|
@AutoConfigureOrder(-2147483648):类生效顺序@Configuration:声明类为配置类@ConditionalOnWebApplication(type = Type.SERVLET)判断应用为原生 Servlet 应用才生效@ConditionalOnClass({DispatcherServlet.class}):当存在 DispatcherServlet 类是生效,而当我们引入 SpringMVC 相关依赖时候,该类就会存在,当前配置才会生效@AutoConfigureAfter({ServletWebServerFactoryAutoConfiguration.class}):告诉该配置类,在括号内的类配置好了后才去配置当前类
只有当上面的配置条件都满足了,才会往下走:
继续向下走,在这个类中有一个子类DispatcherServletConfiguration
1 |
|
前几个注解上面说过了,这里有个@EnableConfigurationProperties({WebMvcProperties.class})
它表示:开启WebMvcProperties类与配置文件的绑定功能,我们点进去看看与哪个配置文件进行了绑定:
1 |
|
喔,会和以spring.mvc为前缀的属性类进行绑定
既然我们绑定完了,以后我们的组件就会存在WebMvcProperties的组件了
接着@Bean,给容器中注册了组件,也就是dispatcherServlet,如何注册的呢?自己 new 了一个DispatcherServlet,设置其中属性,然后 return。相当于底层帮我们配置好了。
再来一个@Bean,又进行了文件上传功能组件的注册。
首先由注解进行了两个判断:
1 | //容器中有这个组件 |
接着去构造一个文件解析器注入容器
什么意思呢?其实说到底就是 SpringMVC 防止有些用户配置的文件上传解析器不符合规范,给你写死了;
小结 + 自定义配置
- 总结:
SpringBoot 先加载所有的自动配置类 xxxxxAutoConfiguration
每个自动配置类按照条件进行生效,默认都会绑定配置文件指定的值。(xxxxProperties 里面读取,xxxProperties 和配置文件进行了绑定)
生效的配置类就会给容器中装配很多组件
只要容器中有这些组件,相当于这些功能就有了
定制化配置
用户直接自己@Bean 替换底层的组件
1
2
3
4
public CharacterEncodingFilter characterEncodingFilter() {
}用户去看这个组件是获取的配置文件什么值就去修改。
去application.properties文件中再比如想修改缓存相关的,我们就点进自动配置类 
发现和`CacheProperties.class`相关的 点进这个类,发现前缀是**spring.cache** 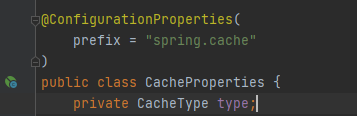
我们就能去到配置文件,进行修改 
xxxxxAutoConfiguration —> 组件 —> xxxxProperties 里面拿值 —-> application.properties
开发技巧
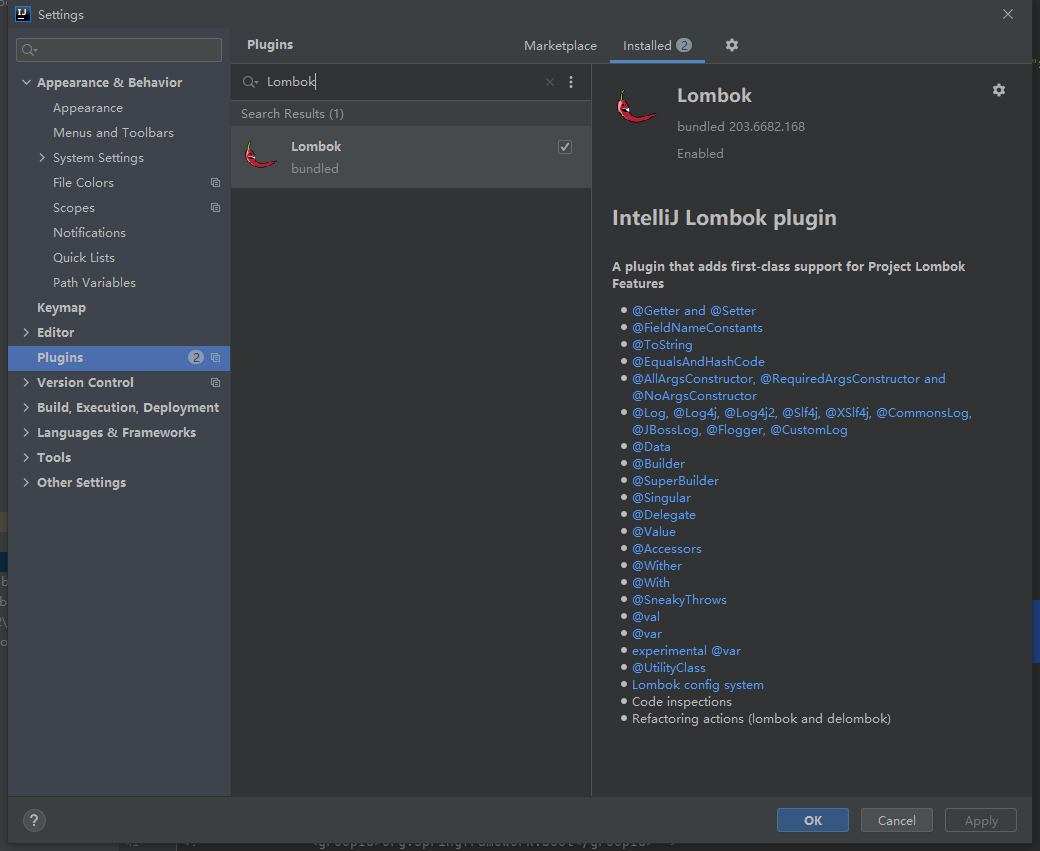
Lombok
作用:Lombok 用标签方式代替构造器、getter/setter、toString()等
- 引入依赖
1 | <dependency> |
- 搜索安装:File->Settings->Plugins→Lombok
使用示例:
- eg1:
1 |
|
- eg2:
1 |
|
dev-tools
作用:实现热部署,Ctrl+F9 就可以重启(如果只改变了静态页面的话以后就不用重启了,可以自动更新)
引入依赖:
1
2
3
4
5<dependency>
<groupId>org.springframework.boot</groupId>
<artifactId>spring-boot-devtools</artifactId>
<optional>true</optional>
</dependency>
Spring Initailizr
Spring Initailizr是创建 Spring Boot 工程向导。
在 IDEA 中,菜单栏 New -> Project -> Spring Initailizr。
配置文件
Spring Boot 弱化配置的特性让属性配置文件的使用也更加便捷,它默认支持对application.properties或application.yml属性配置文件处理,即在application.properties或application.yml文件中添加属性配置,可以使用@Value 注解将属性值注入到beans中,或使用@ConfigurationProperties 注解将属性值绑定到结构化的 beans 中
YAML
YAML 是 JSON 的一个超集,是一种方便的定义层次配置数据的格式,结构层次上清晰明了,配置简单易读、易用。
要想使用 YAML 作为属性配置文件,需要将 SnakeYAML 库添加到 classpath 下,Spring Boot 对 SnakeYAML 库也做了集成,例如使用spring-boot-starter-web或spring-boot-starter都会自动添加SnakeYAML库到 classpath 下。
举个例子,来感受一下 YAML:
- 之前的 properties 文件
1 | =http://dev.example.com |
- 现在的 YAML 文档
1 | environments: |
- 如果存在 property 键的话,之前的写法
1 | =dev.example.com |
- YAML lists 会使用 - 表示键
1 | my: |
基本语法
key: value;kv 之间有空格
大小写敏感
使用缩进表示层级关系
缩进不允许使用 tab,只允许空格(然而 IDEA 支持 tab)
缩进的空格数不重要,只要相同层级的元素左对齐即可
‘#’表示注释
字符串无需加引号(如果字符串为一段数字,该数字以零开头,必须添加上”” 不然 Springboot 会将数字解析成八进制)
如果要加,’’与””表示字符串内容 会被 转义/不转义。(如\n,单引号中作为字符串输出,双引号会换行)
数据类型
- 字面量:单个的、不可再分的值。date、boolean、string、number、null
1 | k: v |
- 对象:键值对的集合。map、hash、set、object
1 | #行内写法: |
- 数组:一组按次序排列的值。array、list、queue
1 | #行内写法: |
实例
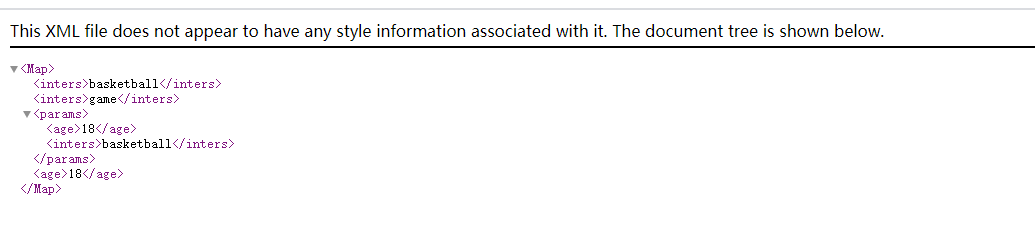
Java 类:
1
2
3
4
5
6
7
8
9
10
11
12
13
14
15
16
17
18
19
20
21
22
23
24
25
public class Person {
private String userName;
private Boolean boss;
private Date birth;
private Integer age;
private Pet pet;
private String[] interests;
private List<String> animal;
private Map<String, Object> score;
private Set<Double> salarys;
private Map<String, List<Pet>> allPets;
}
public class Pet {
private String name;
private Double weight;
}YAML 写法表示:
1
2
3
4
5
6
7
8
9
10
11
12
13
14
15
16
17
18
19
20
21
22
23
24
25
26
27
28
29
30
31
32
33person:
# 单引号会将 \n作为字符串输出 双引号会将\n 作为换行输出
# 双引号不会转义,单引号会转义
boss: true
birth: 2019/12/9
age: 18
# interests: [篮球,足球]
interests:
- 篮球
- 足球
- 18
animal: [阿猫,阿狗]
# score:
# english: 80
# math: 90
score: {english:80,math:90}
salarys:
- 9999.98
- 9999.99
pet:
name: 阿狗
weight: 99.99
allPets:
sick:
- {name: 阿狗,weight: 99.99}
- name: 阿猫
weight: 88.88
- name: 阿虫
weight: 77.77
health:
- {name: 阿花,weight: 199.99}
- {name: 阿明,weight: 199.99}
user-name: zhangsan
## 配置提示
我们注意到在类上有时候会报以下问题:表示自定义的类和配置文件绑定一般没有提示。

想要有提示,需要引入依赖:
1
2
3
4
5
6
7
8
9
10
11
12
13
14
15
16
17
18
19
20
21
22
23
<dependency>
<groupId>org.springframework.boot</groupId>
<artifactId>spring-boot-configuration-processor</artifactId>
<optional>true</optional>
</dependency>
<!-- 下面插件作用是工程打包时,不将spring-boot-configuration-processor打进包内,让其只在编码的时候有用 -->
<build>
<plugins>
<plugin>
<groupId>org.springframework.boot</groupId>
<artifactId>spring-boot-maven-plugin</artifactId>
<configuration>
<excludes>
<exclude>
<groupId>org.springframework.boot</groupId>
<artifactId>spring-boot-configuration-processor</artifactId>
</exclude>
</excludes>
</configuration>
</plugin>
</plugins>
</build>
# Web开发
## SpringMVC自动配置概览
Spring Boot provides auto-configuration for Spring MVC that **works well with most applications.(大多场景我们都无需自定义配置)**
The auto-configuration adds the following features on top of Spring’s defaults:
- Inclusion of `ContentNegotiatingViewResolver` and `BeanNameViewResolver` beans.
- - 内容协商视图解析器和BeanName视图解析器
- Support for serving static resources, including support for WebJars (covered [later in this document](https://docs.spring.io/spring-boot/docs/current/reference/html/spring-boot-features.html#boot-features-spring-mvc-static-content))).
- - 静态资源(包括webjars)
- Automatic registration of `Converter`, `GenericConverter`, and `Formatter` beans.
- - 自动注册 `Converter,GenericConverter,Formatter `
- Support for `HttpMessageConverters` (covered [later in this document](https://docs.spring.io/spring-boot/docs/current/reference/html/spring-boot-features.html#boot-features-spring-mvc-message-converters)).
- - 支持 `HttpMessageConverters` (后来我们配合内容协商理解原理)
- Automatic registration of `MessageCodesResolver` (covered [later in this document](https://docs.spring.io/spring-boot/docs/current/reference/html/spring-boot-features.html#boot-features-spring-message-codes)).
- - 自动注册 `MessageCodesResolver` (国际化用)
- Static `index.html` support.
- - 静态index.html 页支持
- Custom `Favicon` support (covered [later in this document](https://docs.spring.io/spring-boot/docs/current/reference/html/spring-boot-features.html#boot-features-spring-mvc-favicon)).
- - 自定义 `Favicon`
- Automatic use of a `ConfigurableWebBindingInitializer` bean (covered [later in this document](https://docs.spring.io/spring-boot/docs/current/reference/html/spring-boot-features.html#boot-features-spring-mvc-web-binding-initializer)).
- - 自动使用 `ConfigurableWebBindingInitializer` ,(DataBinder负责将请求数据绑定到JavaBean上)If you want to keep those Spring Boot MVC customizations and make more MVC customizations (interceptors, formatters, view controllers, and other features), you can add your own
@Configurationclass of typeWebMvcConfigurerbut without@EnableWebMvc.不用@EnableWebMvc 注解。使用
@Configuration+WebMvcConfigurer自定义规则
If you want to provide custom instances of
RequestMappingHandlerMapping,RequestMappingHandlerAdapter, orExceptionHandlerExceptionResolver, and still keep the Spring Boot MVC customizations, you can declare a bean of typeWebMvcRegistrationsand use it to provide custom instances of those components.声明
WebMvcRegistrations改变默认底层组件
If you want to take complete control of Spring MVC, you can add your own
@Configurationannotated with@EnableWebMvc, or alternatively add your own@Configuration-annotatedDelegatingWebMvcConfigurationas described in the Javadoc of@EnableWebMvc.使用
@EnableWebMvc+@Configuration+DelegatingWebMvcConfiguration 全面接管SpringMVC
功能分析
静态资源的访问
静态资源目录
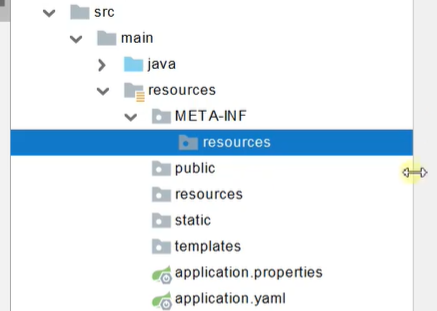
只要把静态资源放在类路径(resources 包)下中 叫做 : /static (or /public or /resources or /META-INF/resources的包,就可以加载
比如现在我们在 static 包下放了个

我们访问一下:
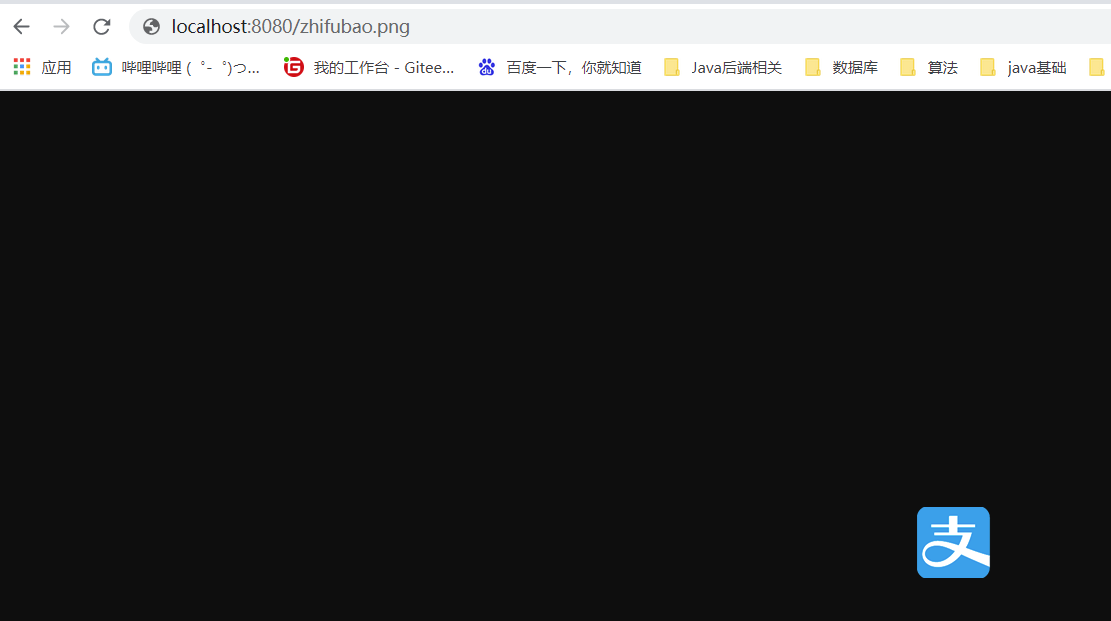
想一想,我明明放在了 resources 包下的 static 包中,为什么直接搜图片就能访问呢?
- 原理: 静态映射/**。
我们来进行一个测试
1 |
|
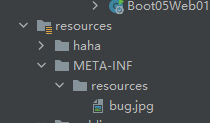
我们编写了一个 controller,requestmapping 指定的是:/bug.jpg;同时我们的静态资源中放入了
那我们现在访问这个路径,究竟是显示 aaaa 呢还是图片呢?
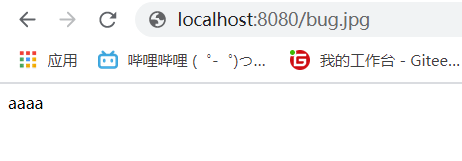
请求进来,先去找Controller看能不能处理。不能处理的所有请求又都交给静态资源处理器。静态资源也找不到则响应 404 页面。
改变默认静态资源路径
1 | resources: |
作用就算将默认资源路径转为了:test
改变静态资源访问前缀
默认的是无前缀的,但我们可以进行修改:
1 | spring: |
作用:当前项目 + static-path-pattern + 静态资源名 = 静态资源文件夹下找
比如上例中我们就得找:locahost:8080/res/xxxx.jpg 了
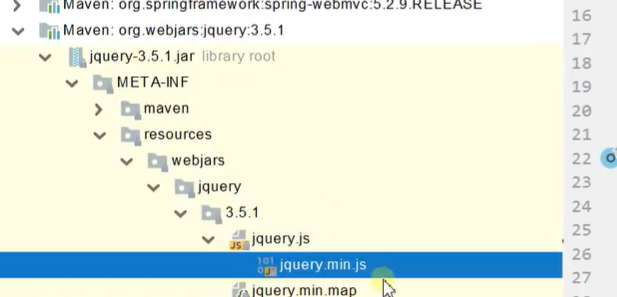
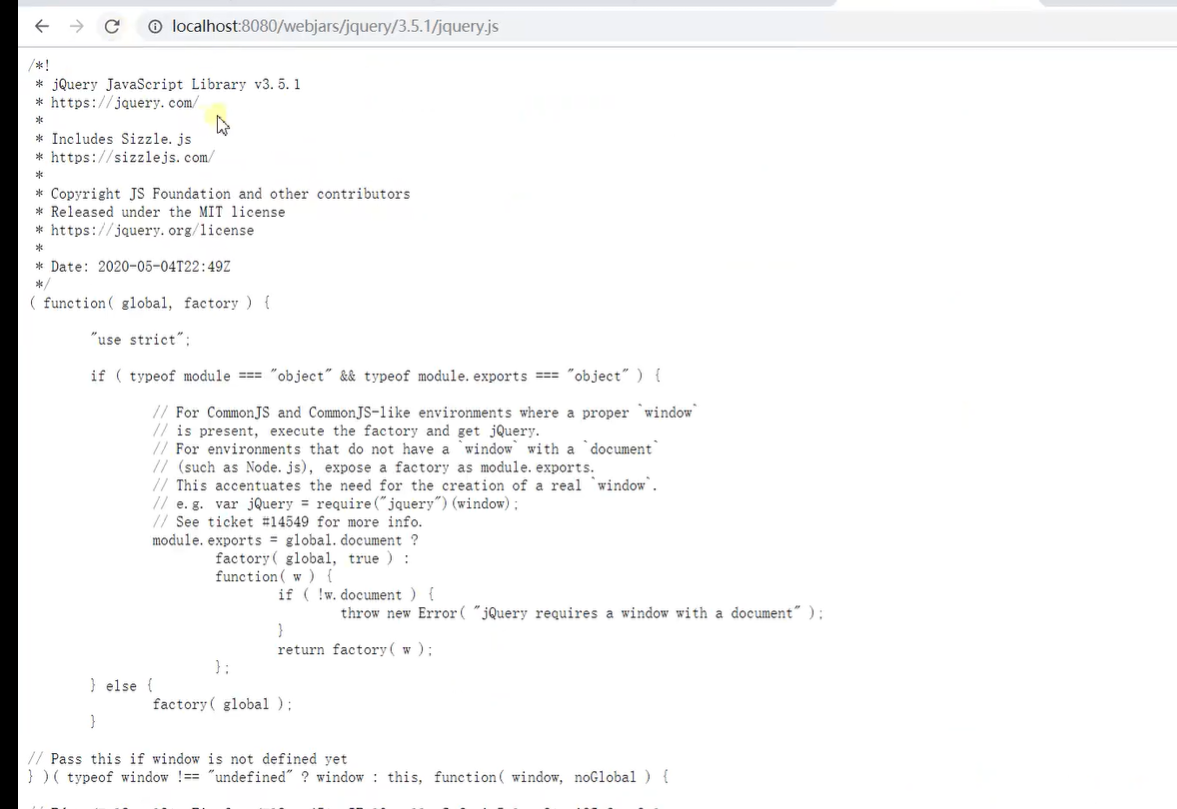
webjar
作用:可用 jar 方式添加 css,js 等资源文件,
1 | <dependency> |
欢迎页支持
静态资源路径下 index.html。
可以配置静态资源路径
但是不可以配置静态资源的访问前缀。否则导致 index.html 不能被默认访问
1
2
3
4
5spring:
# mvc:
# static-path-pattern: /res/** 这个会导致welcome page功能失效
resources:
static-locations: [classpath:/haha/]
controller 能处理/index
自定义 Favicon
指网页标签上的小图标。
favicon.ico 放在静态资源目录下即可。
1 | spring: |
静态资源配置原理
首先 SpringBoot 启动默认加载了很多的自动配置类,也就是 xxxAutoConfiguration类
在自动配置类的包下中的 servlet 包下有着 WebMvcAutoConfiguration 这个类
这是 SpringMVC 功能相关的自动配置类(从名字也看的出来)
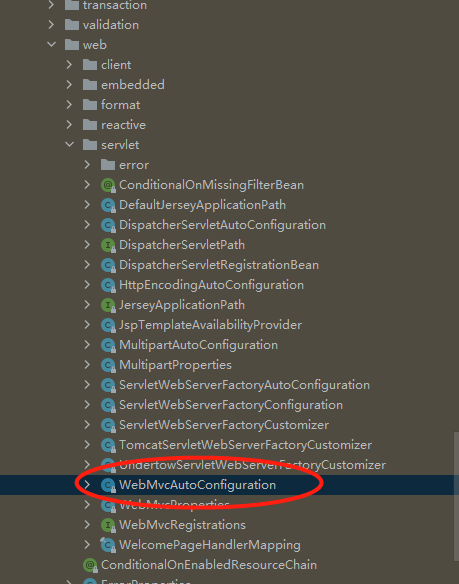
想要让他生效,其类前面的几个注解就必须满足一定的条件:
1
2
3
4
5
6
7
8
9
10//Servlet应用
//有Servlet、DispatcherServlet、WebMvc配置 三个类
//容器中没有 WebMvcConfigurationSupport 这个类下面假设满足条件了,那我们看看这个WebMvcAutoConfiguration 给容器中配了哪些组件
兼容 REST 风格的过滤器
1
2
3
4
5
6
7
8
9
10
public OrderedHiddenHttpMethodFilter hiddenHttpMethodFilter() {
return new OrderedHiddenHttpMethodFilter();
}表单内容的过滤器
1
2
3
4
5
6
7
8
9
10
public OrderedFormContentFilter formContentFilter() {
return new OrderedFormContentFilter();
}适配器(核心)
1
2
3
4
5
6
public static class WebMvcAutoConfigurationAdapter implements WebMvcConfigurer {
//....
}我们留意到这里有着
@EnableConfigurationProperties({WebMvcProperties.class, ResourceProperties.class})说明这里进行了配置文件的绑定,那究竟和什么进行了绑定呢?我们点进去这两个类就可以知道了
1
2
3
4
5
6
7
8
9
10
public class WebMvcProperties
@ConfigurationProperties(
prefix = "spring.resources",
ignoreUnknownFields = false
)
public class ResourceProperties显而易见:WebMvcProperties → spring.mvc; ResourceProperties → spring.resources
- 有参构造器
接着分析,在这个类中只有一个有参构造器,下面看看这个类的值都与什么属性进行了赋值;
1
2
3
4
5
6
7
8
9
10
11
12
13
14
15
16
17
public WebMvcAutoConfigurationAdapter(ResourceProperties resourceProperties, WebMvcProperties mvcProperties, ListableBeanFactory beanFactory, ObjectProvider<HttpMessageConverters> messageConvertersProvider, ObjectProvider<WebMvcAutoConfiguration.ResourceHandlerRegistrationCustomizer> resourceHandlerRegistrationCustomizerProvider, ObjectProvider<DispatcherServletPath> dispatcherServletPath, ObjectProvider<ServletRegistrationBean<?>> servletRegistrations) {
//获取和spring.resources绑定的所有的值的对象
this.resourceProperties = resourceProperties;
//获取和spring.mvc绑定的所有的值的对象
this.mvcProperties = mvcProperties;
//Spring的beanFactory
this.beanFactory = beanFactory;
//所有的 HttpMessageConverters
this.messageConvertersProvider = messageConvertersProvider;
//资源处理器的自定义器
this.resourceHandlerRegistrationCustomizer = (WebMvcAutoConfiguration.ResourceHandlerRegistrationCustomizer)resourceHandlerRegistrationCustomizerProvider.getIfAvailable();
//dispatcherServlet的路径
this.dispatcherServletPath = dispatcherServletPath;
//给应用注册Servlet、Filter等用的
this.servletRegistrations = servletRegistrations;
}
资源处理默认规则
1 | public void addResourceHandlers(ResourceHandlerRegistry registry) { |
逐行来看:
1 | if (!this.resourceProperties.isAddMappings()) { |
这行代码中的``this.resourceProperties ` 我们知道,是 spring.resources 配置文件下绑定的所有配置属性
isAddMappings()是什么呢?假如是 false,我们就只会走logger.debug("Default resource handling disabled");
下面的代码就都不会走了,那我们 true,我们就进入了 else 语句:
1 | Duration cachePeriod = this.resourceProperties.getCache().getPeriod(); |
在这段代码中,我们进行的是:
1 | if (!registry.hasMappingForPattern("/webjars/**")) { |
假如配的路径是 /webjars/** 的话,我们要走/META-INF/resources/webjars/去找资源
1 | String staticPathPattern = this.mvcProperties.getStaticPathPattern(); |
而假如配的路径是其他的(我们配置的,默认的是/**),那么这些请求就会走resourceProperties.getStaticLocations()
也就是指定的路径:private String[] staticLocations = CLASSPATH_RESOURCE_LOCATIONS;
1 | private static final String[] CLASSPATH_RESOURCE_LOCATIONS = { "classpath:/META-INF/resources/", |
这也很好的解释了为什么我们的静态资源文件只要放在那四个指定的包下就可以找到的原因!
综上:也就表示着:静态资源的配置规则
静态资源的禁用方法
可以靠设置下列配置文件,进行静态资源的禁用;
1 | spring: |
欢迎页处理规则
1 |
|
- HandlerMapping:处理器映射器,保存了每个 Handler 能处理哪些请求
这个类的构造方法中,我们注意到:this.mvcProperties.getStaticPathPattern() 这个参数 也就是我们的配置文件中的:
1 | # mvc: |
我们进入它的构造方法:
1 | WelcomePageHandlerMapping(TemplateAvailabilityProviders templateAvailabilityProviders, ApplicationContext applicationContext, Optional<Resource> welcomePage, String staticPathPattern) { |
if (welcomePage.isPresent() && "/**".equals(staticPathPattern))
这句话表示:如果欢迎页存在,且/** 为访问路径前缀 才能走下面的方法(forward:index.html),这也就代表着前面我们欢迎页支持篇章学习的时候,为什么不能使用/res/** 为路径前缀的原因了。因为底层写死了已经。
如果我们的访问路径前缀不按照他的来,就会走下面的方法,调用 Controller 去看看哪个方法能去找到/index
请求参数处理
请求处理
Rest 风格映射原理
@xxxMapping;
Rest 风格支持(_使用HTTP请求方式动词来表示对资源的操作_)
- 以前:/getUser 获取用户 /deleteUser 删除用户 /editUser 修改用户 /saveUser 保存用户
- 现在: /user GET-获取用户 DELETE-删除用户 PUT-修改用户 POST-保存用户
- 核心 Filter;HiddenHttpMethodFilter
怎么用呢?
开启页面表单的 Rest 功能
理由:
1
2
3
4
5
6
public OrderedHiddenHttpMethodFilter hiddenHttpMethodFilter() {
return new OrderedHiddenHttpMethodFilter();
}开启方式:
1
2
3
4
5spring:
mvc:
hiddenmethod:
filter:
enabled: true #开启页面表单的Rest功能页面 form 的属性 method=post,隐藏域 _method=put、delete 等(如果直接 get 或 post,无需隐藏域)
1
2
3
4
5
6
7
8
9
10
11
12
13
14
15
16
17
18<form action="/user" method="get">
<input value="REST-GET提交" type="submit" />
</form>
<form action="/user" method="post">
<input value="REST-POST提交" type="submit" />
</form>
<form action="/user" method="post">
<input name="_method" type="hidden" value="DELETE"/>
<input value="REST-DELETE 提交" type="submit"/>
</form>
<form action="/user" method="post">
<input name="_method" type="hidden" value="PUT" />
<input value="REST-PUT提交"type="submit" />
<form>编写请求映射
1
2
3
4
5
6
7
8
9
10
11
12
13
14
15
16
17
18
19
20
21
22
23
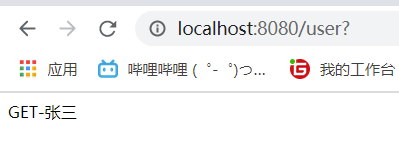
//@RequestMapping(value = "/user",method = RequestMethod.GET)
public String getUser(){
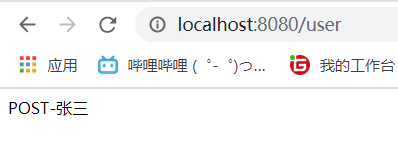
return "GET-张三";
}
//@RequestMapping(value = "/user",method = RequestMethod.POST)
public String saveUser(){
return "POST-张三";
}
//@RequestMapping(value = "/user",method = RequestMethod.PUT)
public String putUser(){
return "PUT-张三";
}
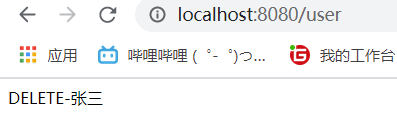
//@RequestMapping(value = "/user",method = RequestMethod.DELETE)
public String deleteUser(){
return "DELETE-张三";
}
Rest 原理(表单提交要使用 REST 的时候)
表单提交会带上_method=PUT
请求过来被HiddenHttpMethodFilter拦截
1
2
3
4
5
6
7
8
9
10
11
12
13
14protected void doFilterInternal(HttpServletRequest request, HttpServletResponse response, FilterChain filterChain) throws ServletException, IOException {
HttpServletRequest requestToUse = request;
if ("POST".equals(request.getMethod()) && request.getAttribute("javax.servlet.error.exception") == null) {
String paramValue = request.getParameter(this.methodParam);
if (StringUtils.hasLength(paramValue)) {
String method = paramValue.toUpperCase(Locale.ENGLISH);
if (ALLOWED_METHODS.contains(method)) {
requestToUse = new HiddenHttpMethodFilter.HttpMethodRequestWrapper(request, method);
}
}
}
filterChain.doFilter((ServletRequest)requestToUse, response);
}if ("POST".equals(request.getMethod()) && request.getAttribute("javax.servlet.error.exception") == null) <!--code94--> 获取到**\_method**的值。 <!--code95--> 转成大写的(无论一开始请求是不是大写的) - ```java if (ALLOWED_METHODS.contains(method)) <!--code96--> 原生 request 是**post**,使用了**包装模式 requesWrapper**重写**了 getMethod**方法,返回的是传入的值(delete,put 等)。 - ```java filterChain.doFilter((ServletRequest)requestToUse, response); <!--code97-->
如何自定义_method 的名字呢?
1 |
|
请求映射原理
常用参数注解
注解
@PathVariable路径变量@RequestHeader获取请求头@RequestParam获取请求参数(指问号后的参数,url?a=1&b=2)@CookieValue获取 Cookie 值@RequestAttribute获取 request 域属性@RequestBody获取请求体[POST]@MatrixVariable矩阵变量@ModelAttribute
测试@PathVariable:
前端页面
1 | <ul> |
Controller:
1 |
|

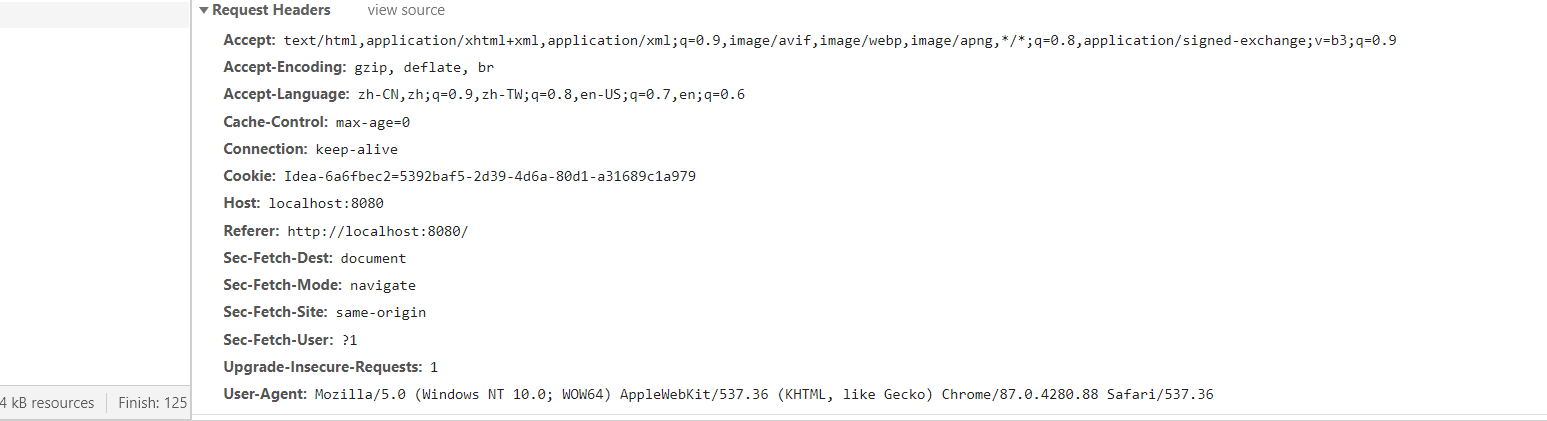
测试@RequestHeader
1 |
|
渲染的数据:
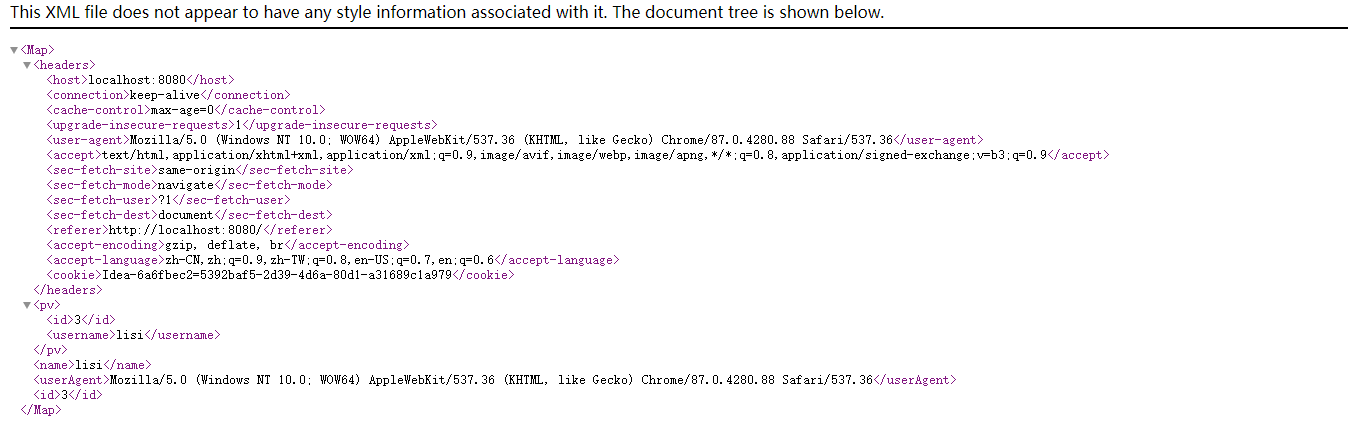
F12 查看的数据:
测试@RequestParam
Controller:
1 |
|
@RequestParam 和@PathVariable 区别
@RequestParam与@PathVariable为 spring 的注解,都可以用于在 Controller 层接收前端传递的数据,不过两者的应用场景不同。
@PathVariable 主要用于接收http://host:port/path/{参数值}数据。@RequestParam 主要用于接收 http://host:port/path?参数名=参数值数据,这里后面也可以不跟参数值。
@RequestParam 和@PathVariable 这两者之间区别不大,主要是请求的 URL 不一样
用@RequestParam 请求接口时,URL 是: http://www.test.com/user/getUserById?userId=1
用@PathVariable 请求接口时,URL 是: http://www.test.com/user/getUserById/2
1 | //@PathVariable用法 |
value 表示接收数据的名称。required 表示接收的参数值是否必须,默认为 true,既默认参数必须不为空,当传递过来的参数可能为空的时候可以设置 required=false。此外还有一个参数 defaultValue 表示如果此次参数未空则为其设置一个默认值。
1 |
|
@PathVariable 主要应用场景:不少应用为了实现 RestFul 的风格,采用@PathVariable 这种方式。
测试@CookieValue
Controller:
1 |
|

测试@RequestBody
前端:
1 | <form action="/save" method="post"> |
Controller:
1 |
|

输入 apple 123

测试@RequestAttribute 和@SessionAttribute
新建一个项目AttributeTest,加入所需的jar文件,示例代码如下:
- index.jsp
1 | <%@ page language="java" contentType="text/html; charset=UTF-8" |
复制
- AttributeController.java
1 |
|
attributeTest方法处理请求后重定向到main请求,main请求会被自定义过滤器拦截,在过滤器中会分别设置两个属性到request作用域和session作用域。在main方法中使用@RequestAttribute和@SessionAttribute进行赋值
- TestAttributeFilter.java
1 | package org.fkit.filter; |
TestAttributeFilter过滤器拦截"main"请求,在dofilter方法中分别设置两个属性到request作用域和session作用域。
部署AttributeTest这个Web应用,在浏览器中输入如下URL来测试应用:
1 | http://localhost:8080/AttributeTest/ |
复制
单击测试@RequestAttribute和@SessionAttribute"超链接发送请求,将调用attrbuteTest方法,然后经过过滤器,重定向到main方法,控制台输出结果如下:
1 | attributeTest方法被调用... |
复制
浏览器显示内容:
1 | name:小明 |
复制
可以看到, request作用域中的name的值被传递到请求处理方法main的name变量, session作用域中的sex的值被传递到请求处理方法main的sex变量,并输出打印在控制台。
@GetMapping、@PostMapping 和@RequestMapping 的区别
@GetMapping
用于将 HTTP GET 请求映射到特定处理程序方法的注释。具体来说,@GetMapping 是一个作为快捷方式的组合注释
是@RequestMapping(method = RequestMethod.GET)的缩写@PostMapping
用于将 HTTP POST 请求映射到特定处理程序方法的注释。具体来说,@PostMapping 是一个作为快捷方式的组合注释
是@RequestMapping(method = RequestMethod.POST)的缩写
@RequestMapping
一般情况下都是用@RequestMapping(method=RequestMethod.),因为@RequestMapping 可以直接替代以上两个注解,但是以上两个注解并不能替代@RequestMapping,@RequestMapping 相当于以上两个注解的父类!
类似的组合注解还有:
@PutMapping、@DeleteMapping、@PatchMapping
总结下来就是@PostMapping 和@GetMapping 都可以用@RequestMapping 代替,如果读者怕在映射的时候出错,可以统一写@RequestMapping,当然这样写的话也有弊端,笼统的全用@RequestMapping, 不便于其他人对代码的阅读和理解!
视图解析 - hymeleaf
由于我们的 SpringBoot 默认不支持JSP,因此就需要引入第三方模板引擎技术去实现我们的页面渲染
- 引入依赖
1 | <dependency> |
自动配置 Thymeleaf
1 |
|
自动配置策略:
- 所有 thymeleaf 的配置值都在 ThymeleafProperties
- 配置好了 SpringTemplateEngine
- 配好了 ThymeleafViewResolver
- 我们只需要直接开发页面
我们开发的页面放在哪里呢?我们根据源码:
1 | public static final String DEFAULT_PREFIX = "classpath:/templates/";//模板放置处 |
得知,需要构造一个 tempplates 包,文件后缀为 html
测试
下面来感受一下;
前端页面:
1 |
|
编写一个控制层:
1 |
|

基本语法
表达式
| 表达式名字 | 语法 | 用途 |
|---|---|---|
| 变量取值 | ${…} | 获取请求域、session 域、对象等值 |
| 选择变量 | *{…} | 获取上下文对象值 |
| 消息 | #{…} | 获取国际化等值 |
| 链接 | @{…} | 生成链接 |
| 片段表达式 | ~{…} | jsp:include 作用,引入公共页面片段 |
设置属性 - th:attr
设置单个值
1
2
3
4
5
6
7
8
9
10<form action="subscribe.html" th:attr="action=@{/subscribe}">
<fieldset>
<input type="text" name="email" />
<input
type="submit"
value="Subscribe!"
th:attr="value=#{subscribe.submit}"
/>
</fieldset>
</form>设置多个值
1
2
3
4<img
src="../../images/gtvglogo.png"
th:attr="src=@{/images/gtvglogo.png},title=#{logo},alt=#{logo}"
/>
迭代
1 | <tr th:each="prod : ${prods}"> |
1 | <tr th:each="prod,iterStat : ${prods}" th:class="${iterStat.odd}? 'odd'"> |
条件运算
1 | <a |
1 | <div th:switch="${user.role}"> |
WEB 实验开发
基本功能实现
登录页面
/static放置 css,js 等静态资源/templates/login.html登录页
前端页面
1 | <html lang="en" xmlns:th="http://www.thymeleaf.org"> |
- 主页的位置:/templates/main.html
Thymeleaf 的行内写法:
1 | <p>Hello, [[${session.user.name}]]!</p> |
登录控制层
1 |
|
模型
1 |
|
数据访问
数据库场景自动配置与整合
导入 JDBC
JDBC 依赖:
1
2
3
4<dependency>
<groupId>org.springframework.boot</groupId>
<artifactId>spring-boot-starter-data-jdbc</artifactId>
</dependency>
在这个包(spring-boot-starter-data-jdbc)中,我们导入了:
spring-jdbc 的包
1
2
3
4
5
6<dependency>
<groupId>org.springframework.data</groupId>
<artifactId>spring-data-jdbc</artifactId>
<version>2.1.1</version>
<scope>compile</scope>
</dependency>springboot-starter 的包
1
2
3
4
5
6<dependency>
<groupId>org.springframework.boot</groupId>
<artifactId>spring-boot-starter-jdbc</artifactId>
<version>2.4.0</version>
<scope>compile</scope>
</dependency>
而在 starter 包中,引入三个重要的包:
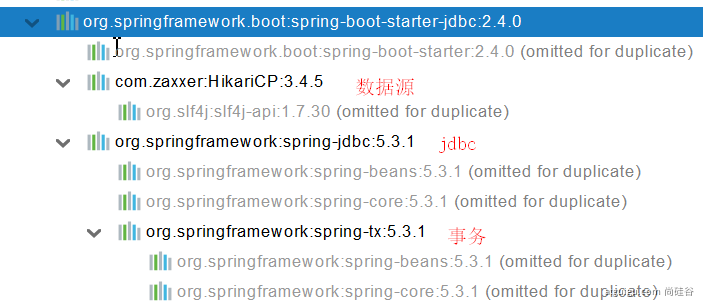
然而我们发现,并没有我们之前去做 JDBC 必导的一个包——数据库驱动的包;
1 | <dependency> |
为什么呢?因为官方让我们进行自行选择要连接的数据库;
下面我们以 Mysql 为例:
引入依赖:
1
2
3
4
5
6
7
8
9
10
11
12
13
14
15
16
17
18
19
20<!--默认版本 这是springboot版本仲裁后的版本:-->
<mysql.version>8.0.22</mysql.version>
<dependency>
<groupId>mysql</groupId>
<artifactId>mysql-connector-java</artifactId>
<!--不需要我们写版本 但假如写了 就会替换成写了的版本-->
<!--<version>5.1.49</version>-->
</dependency>
<!--
想要修改版本
1、直接依赖引入具体版本(maven的就近依赖原则)
2、重新声明版本(maven的属性的就近优先原则)
-->
<properties>
<java.version>1.8</java.version>
<mysql.version>5.1.49</mysql.version>
</properties>
分析自动配置
自动配置的类
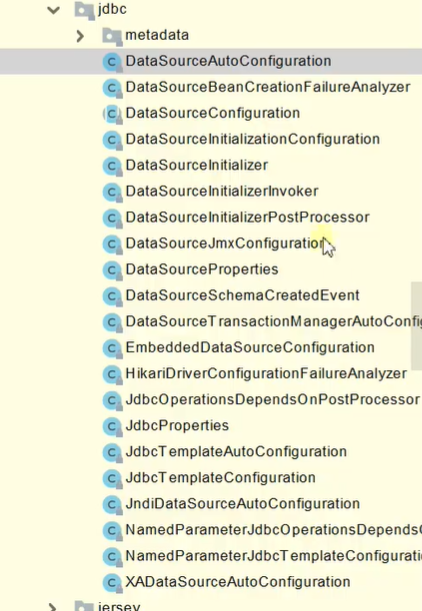
DataSourceAutoConfiguration: 数据源的自动配置。修改数据源相关的配置 → 修改
spring.datasource即可1
2
3
4
public class DataSourceProperties implements BeanClassLoaderAware, InitializingBean数据库连接池的配置,是自己容器中没有 DataSource 才自动配置的。
1
2
3
4
5
6...
...
protected static class PooledDataSourceConfiguration {
protected PooledDataSourceConfiguration() {
}底层配置好的连接池是:
HikariDataSource。
DataSourceTransactionManagerAutoConfiguration: 事务管理器的自动配置。JdbcTemplateAutoConfiguration: JdbcTemplate 的自动配置,可以来对数据库进行 CRUD。可以修改这个配置项@ConfigurationProperties(prefix = “spring.jdbc”) 来修改 JdbcTemplate
1
2
3
4
public class JdbcProperties在
JdbcTemplateConfiguration类中放置了一个JdbcTemplate对象,该对象操作的是参数中的数据源,相关的设置可以在 properties 中修改。1
2
3
4
5
6
7
8
9
10
JdbcTemplate jdbcTemplate(DataSource dataSource, JdbcProperties properties) {
JdbcTemplate jdbcTemplate = new JdbcTemplate(dataSource);
Template template = properties.getTemplate();
jdbcTemplate.setFetchSize(template.getFetchSize());
jdbcTemplate.setMaxRows(template.getMaxRows());
if (template.getQueryTimeout() != null) {
jdbcTemplate.setQueryTimeout((int)template.getQueryTimeout().getSeconds());
}修改的方式:(设置了一个请求超时的时间)
1
2
3jdbc:
template:
query-timeout: 3
JndiDataSourceAutoConfiguration: JNDI 的自动配置XADataSourceAutoConfiguration: 分布式事务相关的。
修改配置项
1 | spring: |
单元测试数据源
- Spring 容器中有这个 JdbcTemplate 组件,使用@Autowired 注入。
1 | import org.junit.jupiter.api.Test; |


Druid 数据库连接池
虽然 Springboot 帮我们配置了数据源:HikariDataSource,但我们有时候就是想用 Druid,那该怎么办呢?
(ps:有自定义配置方式,也就是不用 starter 的,但是那个之后再学习吧~)
引入依赖
1
2
3
4
5<dependency>
<groupId>com.alibaba</groupId>
<artifactId>druid-spring-boot-starter</artifactId>
<version>1.1.17</version>
</dependency>
分析自动配置
1 |
|
({DruidDataSource.class}) <!--code143--> 确保 Druid 自动配置类的加载是在`DataSourceAutoConfiguration`(大的自动配置类)配置前进行加载 为什么是之前? 因为我们 Springboot 会先导入默认的 Hikari 数据源,而这么做的后果就是: <!--code144--> 这个`@ConditionalOnMissingBean`注解就不会生效了,进而导致我们的数据源不会进行配置啦!({DruidStatProperties.class, DataSourceProperties.class}) <!--code145-->({DruidSpringAopConfiguration.class, DruidStatViewServletConfiguration.class, DruidWebStatFilterConfiguration.class, DruidFilterConfiguration.class}) <!--code146-->
测试配置
我们根据@EnableConfigurationProperties 和 @Import知道了 Druid 的属性与配置文件的哪些属性进行绑定了,接下来我们就能够自己去配置文件中修改属性了。下面就来试试
1 | spring: |
整合 Mybatis
引入依赖:
1
2
3
4
5<dependency>
<groupId>org.mybatis.spring.boot</groupId>
<artifactId>mybatis-spring-boot-starter</artifactId>
<version>2.1.4</version>
</dependency>ps:从配置文件可以看出来这个 starter 是第三方的,怎么看出来的呢?
Springboot 的 starter:
spring-boot-starter-*第三方的 starter:
*-spring-boot-starter
整合 Mybatis-配置版
回想一下之前学习 SSM 的时候 Mybatis 使用步骤:
- 配置一个全局的配置文件
- 写接口
- 创建 SqlSessionFactory
- 调用第三步创建 SqlSession
- 通过 SqlSession 获取 mapper
- 调用 mapper 方法
现在进化了,使用了 SpringBoot 又该如何去实现呢?
Mybatis 的自动配置功能将将 SqlSessionFacrory 自动配置好,注入到 Bean 中了;
1 |
|
而 SqlSession 也自动配置了SqlSessionTemplate 组合了 SqlSession
1 |
|
在 Mapper 扫描包的配置文件中,我们关注第二个注解:@Import({MybatisAutoConfiguration.AutoConfiguredMapperScannerRegistrar.class})
1 |
|
这个AutoConfiguredMapperScannerRegistrar是有什么用的呢?
在这个类中有一个方法,大意就是扫描全部带有@Mapper注解的接口,然后认为是用于操作 Mybatis 的接口;
因此,只要我们写的操作 Mybatis 的接口标注了@Mapper就会被自动扫描进来
1 | public void registerBeanDefinitions(AnnotationMetadata importingClassMetadata, BeanDefinitionRegistry registry) { |
接着,我们就权当复习一下 Mybatis,进行一下 Mybatis 的 CRUD;
首先创建 bean:
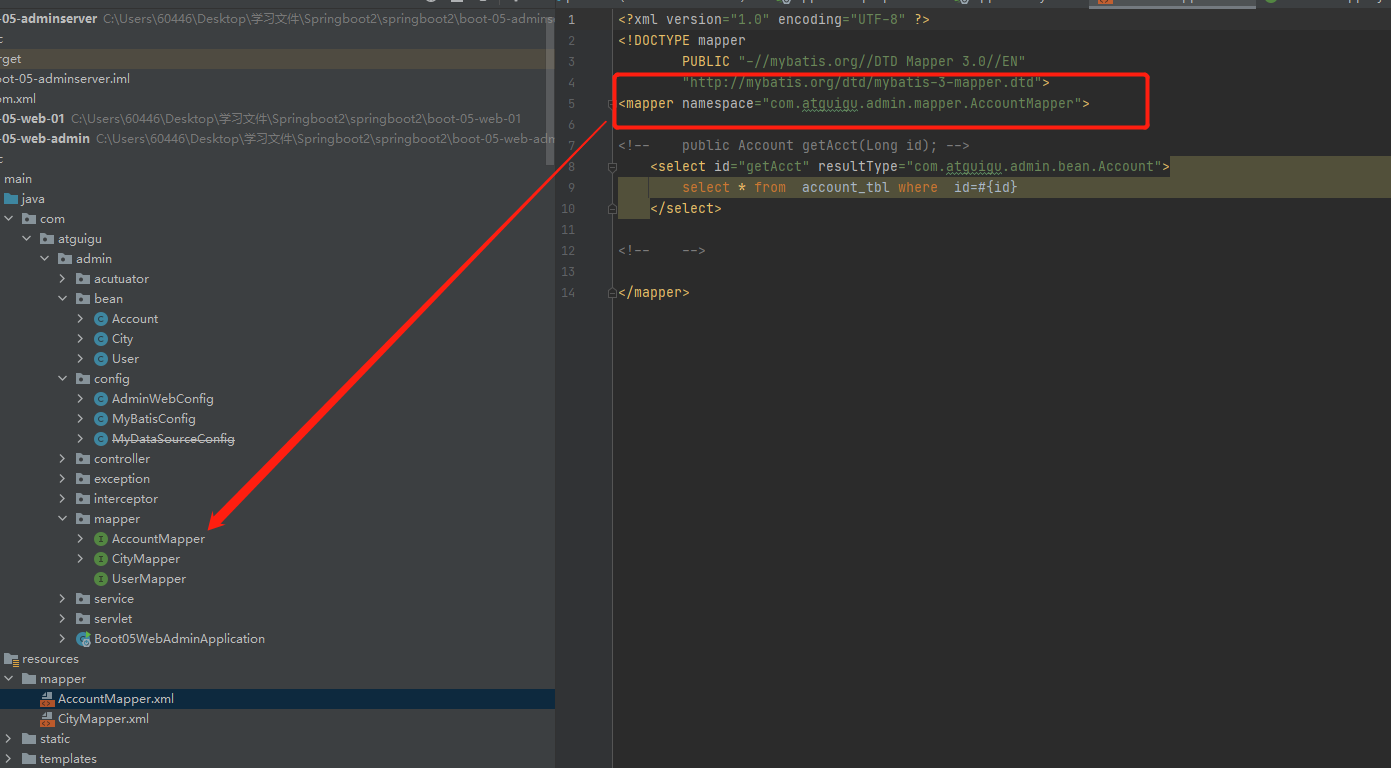
接着创建接口:
1
2
3
4
public interface AccountMapper {
public Account getAcct(Long id);
}编写映射文件
1
2
3
4
5
6
7
8
9
10
11
12
<mapper namespace="com.atguigu.admin.mapper.AccountMapper">
<!-- public Account getAcct(Long id); -->
<select id="getAcct" resultType="com.atguigu.admin.bean.Account">
select * from account_tbl where id=#{id}
</select>
</mapper>接着:我们看看 Mybatis 的自动配置类,就可以知道我们接下来要干什么了
1
2
3
4
5
6
7
8
9
10
11: MyBatis配置项绑定类。
public class MybatisAutoConfiguration{
...
}
public class MybatisProperties{
...
}我们找到了
@ConfigurationProperties(prefix = "mybatis")这条关键信息;得知,我们可以通过修改配置文件以mybatis开头的属性了;
1
2
3
4
5
6
7
8
9
10
11
12spring:
datasource:
username: root
password: 1234
url: jdbc:mysql://localhost:3306/my
driver-class-name: com.mysql.jdbc.Driver
# 配置mybatis规则
mybatis:
config-location: classpath:mybatis/mybatis-config.xml #全局配置文件位置
mapper-locations: classpath:mybatis/*.xml #sql映射文件位置全局配置文件:mybatis-config.xml
1
2
3
4
5
6
7
8
9
<configuration>
<!-- 由于Spring Boot自动配置缘故,此处不必配置,只用来做做样。-->
</configuration>创建 Service 层和 Controller 层:
Service 层
1
2
3
4
5
6
7
8
9
10
11
12
13
14
15
16public interface AccountService {
Account getAcctByid(Long id);
}
public class AccountServiceImpl implements AccountService {
AccountMapper accountMapper;
public Account getAcctByid(Long id){
return accountMapper.getAcct(id);
}
}Controller 层
1
2
3
4
5
6
7
8
9
10
11
public class IndexController{
AccountService accountService;
public Account getById( Long id){
return accountService.getAcctByid(id);
}
}
同时我们可以知道一点:
配置 private Configuration configuration; 也就是配置 mybatis.configuration 相关的,就是相当于改 mybatis 全局配置文件中的值。(也就是说配置了 mybatis.configuration,就不需配置 mybatis 全局配置文件了)
因此,对于 mybatis 的配置文件我们也可以写成:
1 | # 配置mybatis规则 |
整合 Mybatis - 注解配置混合版
材料准备
首先还是得已进入 Mybatis 的 Starter:
1
2
3
4
5<dependency>
<groupId>org.mybatis.spring.boot</groupId>
<artifactId>mybatis-spring-boot-starter</artifactId>
<version>2.1.4</version>
</dependency>数据库:
1
2
3
4
5
6CREATE TABLE city (
id INT(11) PRIMARY KEY AUTO_INCREMENT,
NAME VARCHAR(30),
state VARCHAR(30),
country VARCHAR(30)
);bean
1
2
3
4
5
6
7
8
public class City {
private Long id;
private String name;
private String state;
private String country;
}
纯注解版本
如果采用这种方式,就不用编写 xml;
- Mapper
1 |
|
Service 和 Controller 层
Service:
1
2
3
4
5
6
7
8
9
10
11
12
13
14
15
16
17
18
19
20
21
22
23
24
25
26
27
28
29
30
31
32//接口
public interface CityService {
City getById(Long id);
void saveCity(City city);
}
//实现类
public class CityServiceImpl implements CityService {
CityMapper cityMapper;
Counter counter;
public CityServiceImpl(MeterRegistry meterRegistry){
counter = meterRegistry.counter("cityService.saveCity.count");
}
public City getById(Long id){
return cityMapper.getById(id);
}
public void saveCity(City city) {
counter.increment();
cityMapper.insert(city);
}
}Controller:
1
2
3
4
5
6
7
8
9
10
11
12
13
public City saveCity(City city){
cityService.saveCity(city);
return city;
}
public City getCityById( Long id){
return cityService.getById(id);
}
混合版本
- 配置文件:
1 |
|
mapper:
1
2
3
4
5
6
7
8
9
10
public interface CityMapper {
public City getById(Long id);
//配置文件中有方法了,因此不需要用注解
public void insert(City city);
}
小结
简单 DAO 方法就写在注解上。复杂的就写在配置文件里。
使用
@MapperScan("com.lun.boot.mapper")简化,Mapper 接口就可以不用标注@Mapper注解。1
2
3
4
5
6
7
8
9
public class Boot05WebAdminApplication {
public static void main(String[] args) {
SpringApplication.run(Boot05WebAdminApplication.class, args);
}
}
整合 Mybatis-Plus
引入依赖:
1
2
3
4
5
6<!--会帮我们引入jdbc和mybatis的依赖-->
<dependency>
<groupId>com.baomidou</groupId>
<artifactId>mybatis-plus-boot-starter</artifactId>
<version>3.4.1</version>
</dependency>引入了 starter,按照惯例,接下来就是分析下到底配置了些什么内容:
1 |
|
经典的@EnableConfigurationProperties({MybatisPlusProperties.class}),由这个注解可以知道和哪个前缀进行绑定:
1 |
|
答案是和mybatis-plus;这样子 以后写 mybatis-plus: xxx 就是对 mybatis-plus 的定制了
接着是SqlSessionFacoty,从类也可以看出来 是自动配置好的(代码是在太多了 就不全部截取)
1 |
|
同时我们还注意到 mybatisPlusProperties 中有个属性:mapperLocations 翻译过来就是 mapper 的路径,它也是自动配置好的,有一个默认值:classpath*:/mapper/**/*.xml;
这表示:任意包的类路径下的所有 mapper 文件夹下任意路径下的所有 xml都是sql 映射文件(有点绕,但是如果理解了**表示什么应该还是很好理解)
再然后是sqlSessionTemplate,也自动配置好了;
1 |
|
最后是注册类,表示着带@Mapper注解标注的接口会被自动扫描(当然建议使用@MaaperScan 进行批量包扫描)
1 | public void registerBeanDefinitions(AnnotationMetadata importingClassMetadata, BeanDefinitionRegistry registry) { |
MybatisPlus 有一个很好的优点:Mapper 接口只需要继承 MybatisPlus 的BaseMapper接口即可自动拥有CRUD的功能;
1
2
3public interface UserMapper extends BaseMapper<User> {
}
测试
- 我们的 bean 类对应的是数据库哪张表呢?我们可以通过 MyBatis 给我们提供的@TableName 注解去指定表;
1 |
|
Mapper 层:
1
2
3public interface UserMapper extends BaseMapper<User> {
}Service 层:
首先是接口 继承了 MybatisPlus 的 IService 接口,泛型是返回的类
1
2
3public interface UserService extends IService<User> {
}然后是接口实现类
1
2
3
4
public class UserServiceImpl extends ServiceImpl<UserMapper,User> implements UserService {
//不用写
}
测试:
1
2
3
4
5
void testUserMapper(){
User user = userMapper.selectById(1L);
log.info("用户信息:{}",user);
}